Free to start — no separate account to create
SeeOnWall for WooCommerce is a free plugin, and connecting it provisions a free SeeOnWall account automatically: no signup form, no API key to copy anywhere. WooCommerce itself has to be installed and active first, since SeeOnWall extends it rather than replacing it. Paid plans, if you ever want higher limits, are billed by SeeOnWall directly from the settings page — never through WooCommerce.
Install and activate the plugin
Everything happens inside your own WordPress admin. There is no external site to visit and nothing to download by hand.
View the plugin on WordPress.org ↗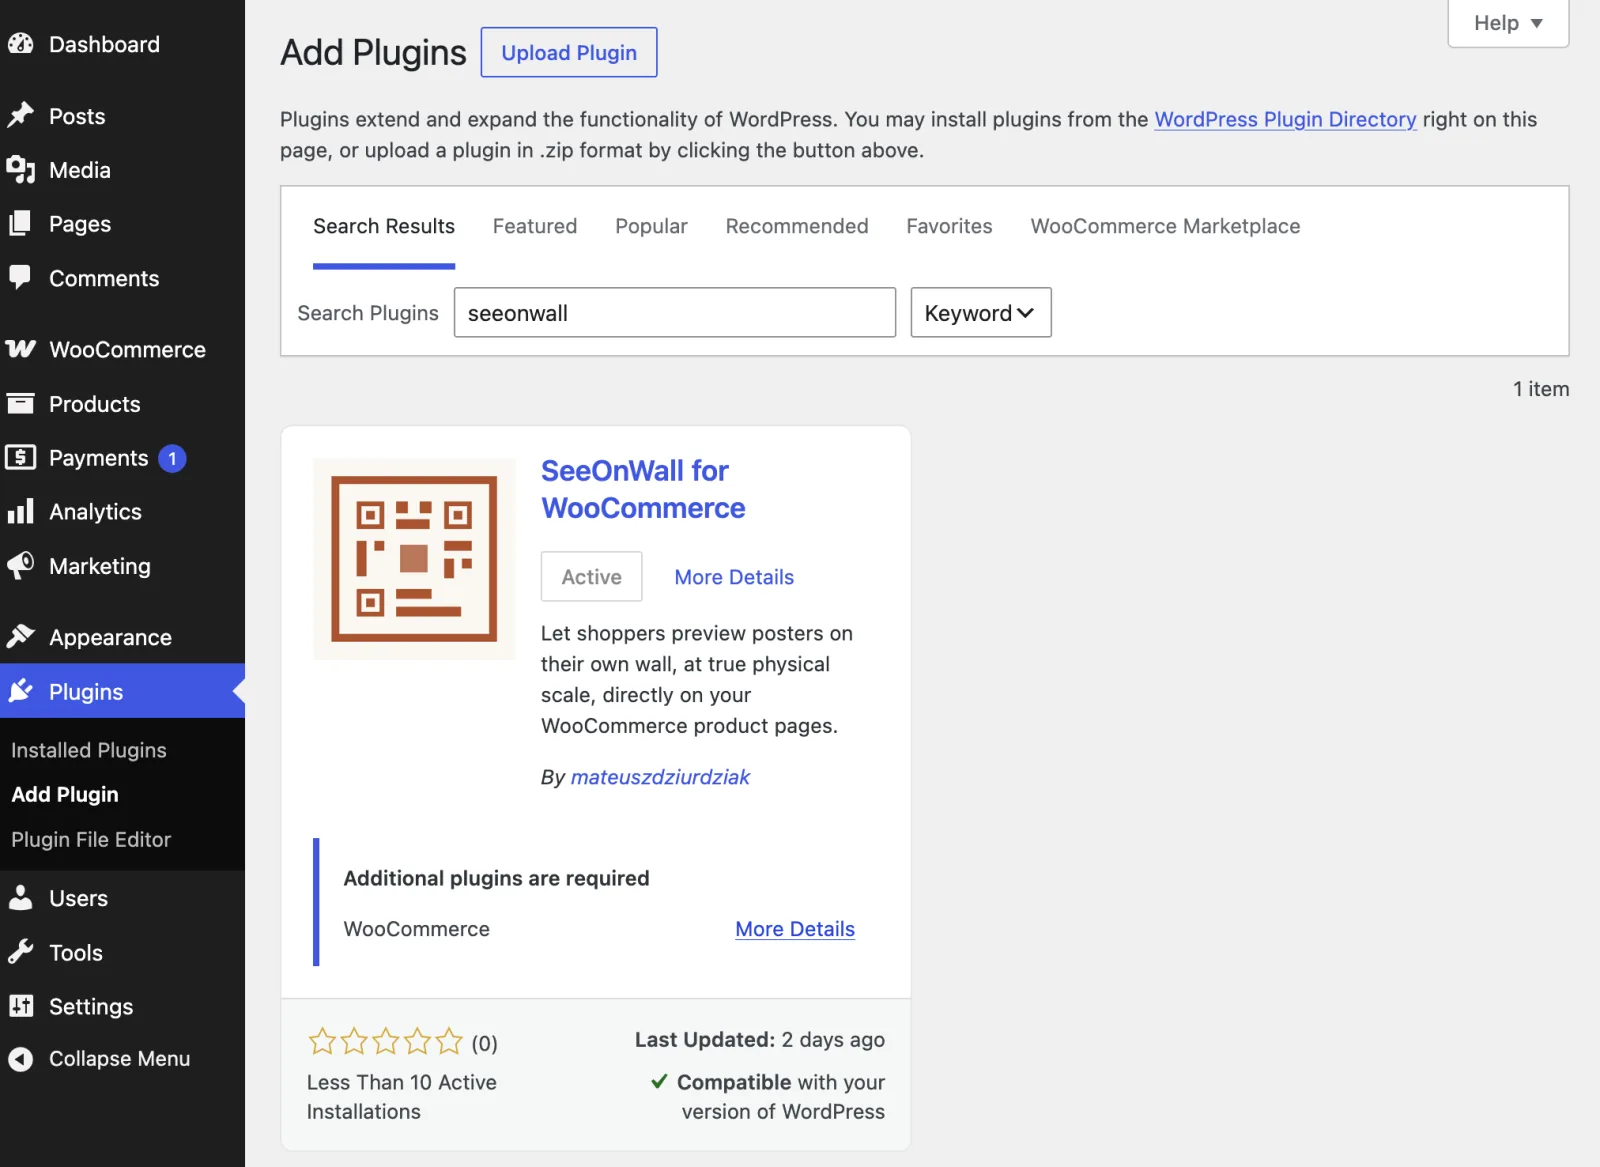
- Find it in the plugin directory
- In the admin sidebar, go to Plugins → Add Plugin, then type
SeeOnWallinto the Search Plugins box at the top right. The result you want is called “SeeOnWall for WooCommerce”. - Install, then activate
- Click Install Now on the plugin card, then click the same button again once it turns into Activate. A SeeOnWall entry appears in the WooCommerce menu straight away.
- If WooCommerce isn’t active yet
- The plugin card shows an “Additional plugins are required” notice. Install and activate WooCommerce first, from the same Plugins → Add Plugin screen, then come back and activate SeeOnWall.
Connect your store
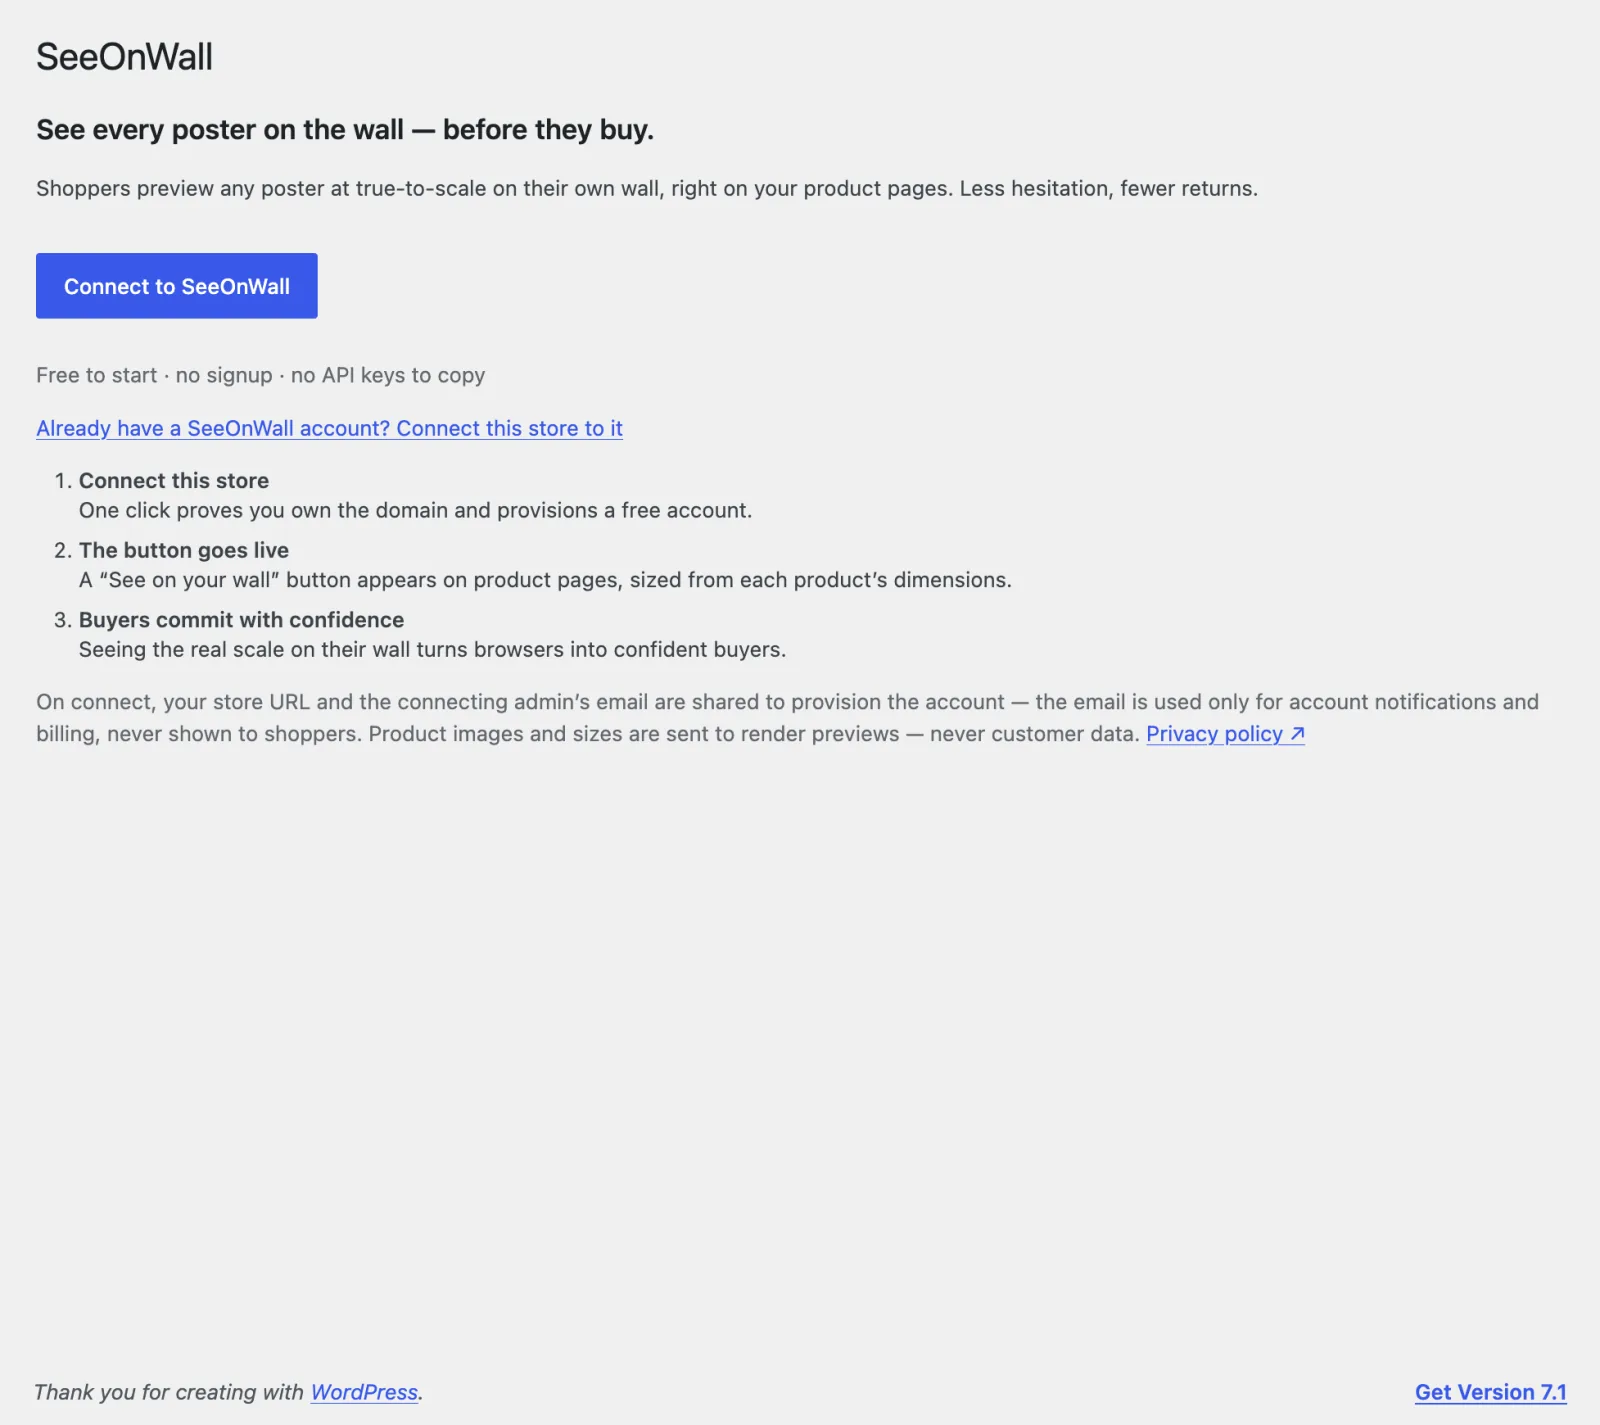
The first time you open WooCommerce → SeeOnWall you get a welcome screen instead of settings. Nothing is connected yet, and there is nothing for you to type in.
- One click, no signup
- Press Connect to SeeOnWall. The plugin proves it controls your site’s domain and a free account is provisioned for you — no password to set, no confirmation email to click. A few seconds later the page reloads on its own with your settings on it.
- Already have an account?
- Use the “Already have a SeeOnWall account? Connect this store to it” link instead. A tab opens on seeonwall.com where you sign in and approve the store, and this page finishes the connection by itself.
- What gets shared
- Your store’s URL and the email address of the admin who clicks Connect, so the account can be created and you can be reached about it. Product images and sizes are sent to render the previews. Nothing about your shoppers is ever sent.
Settings tab
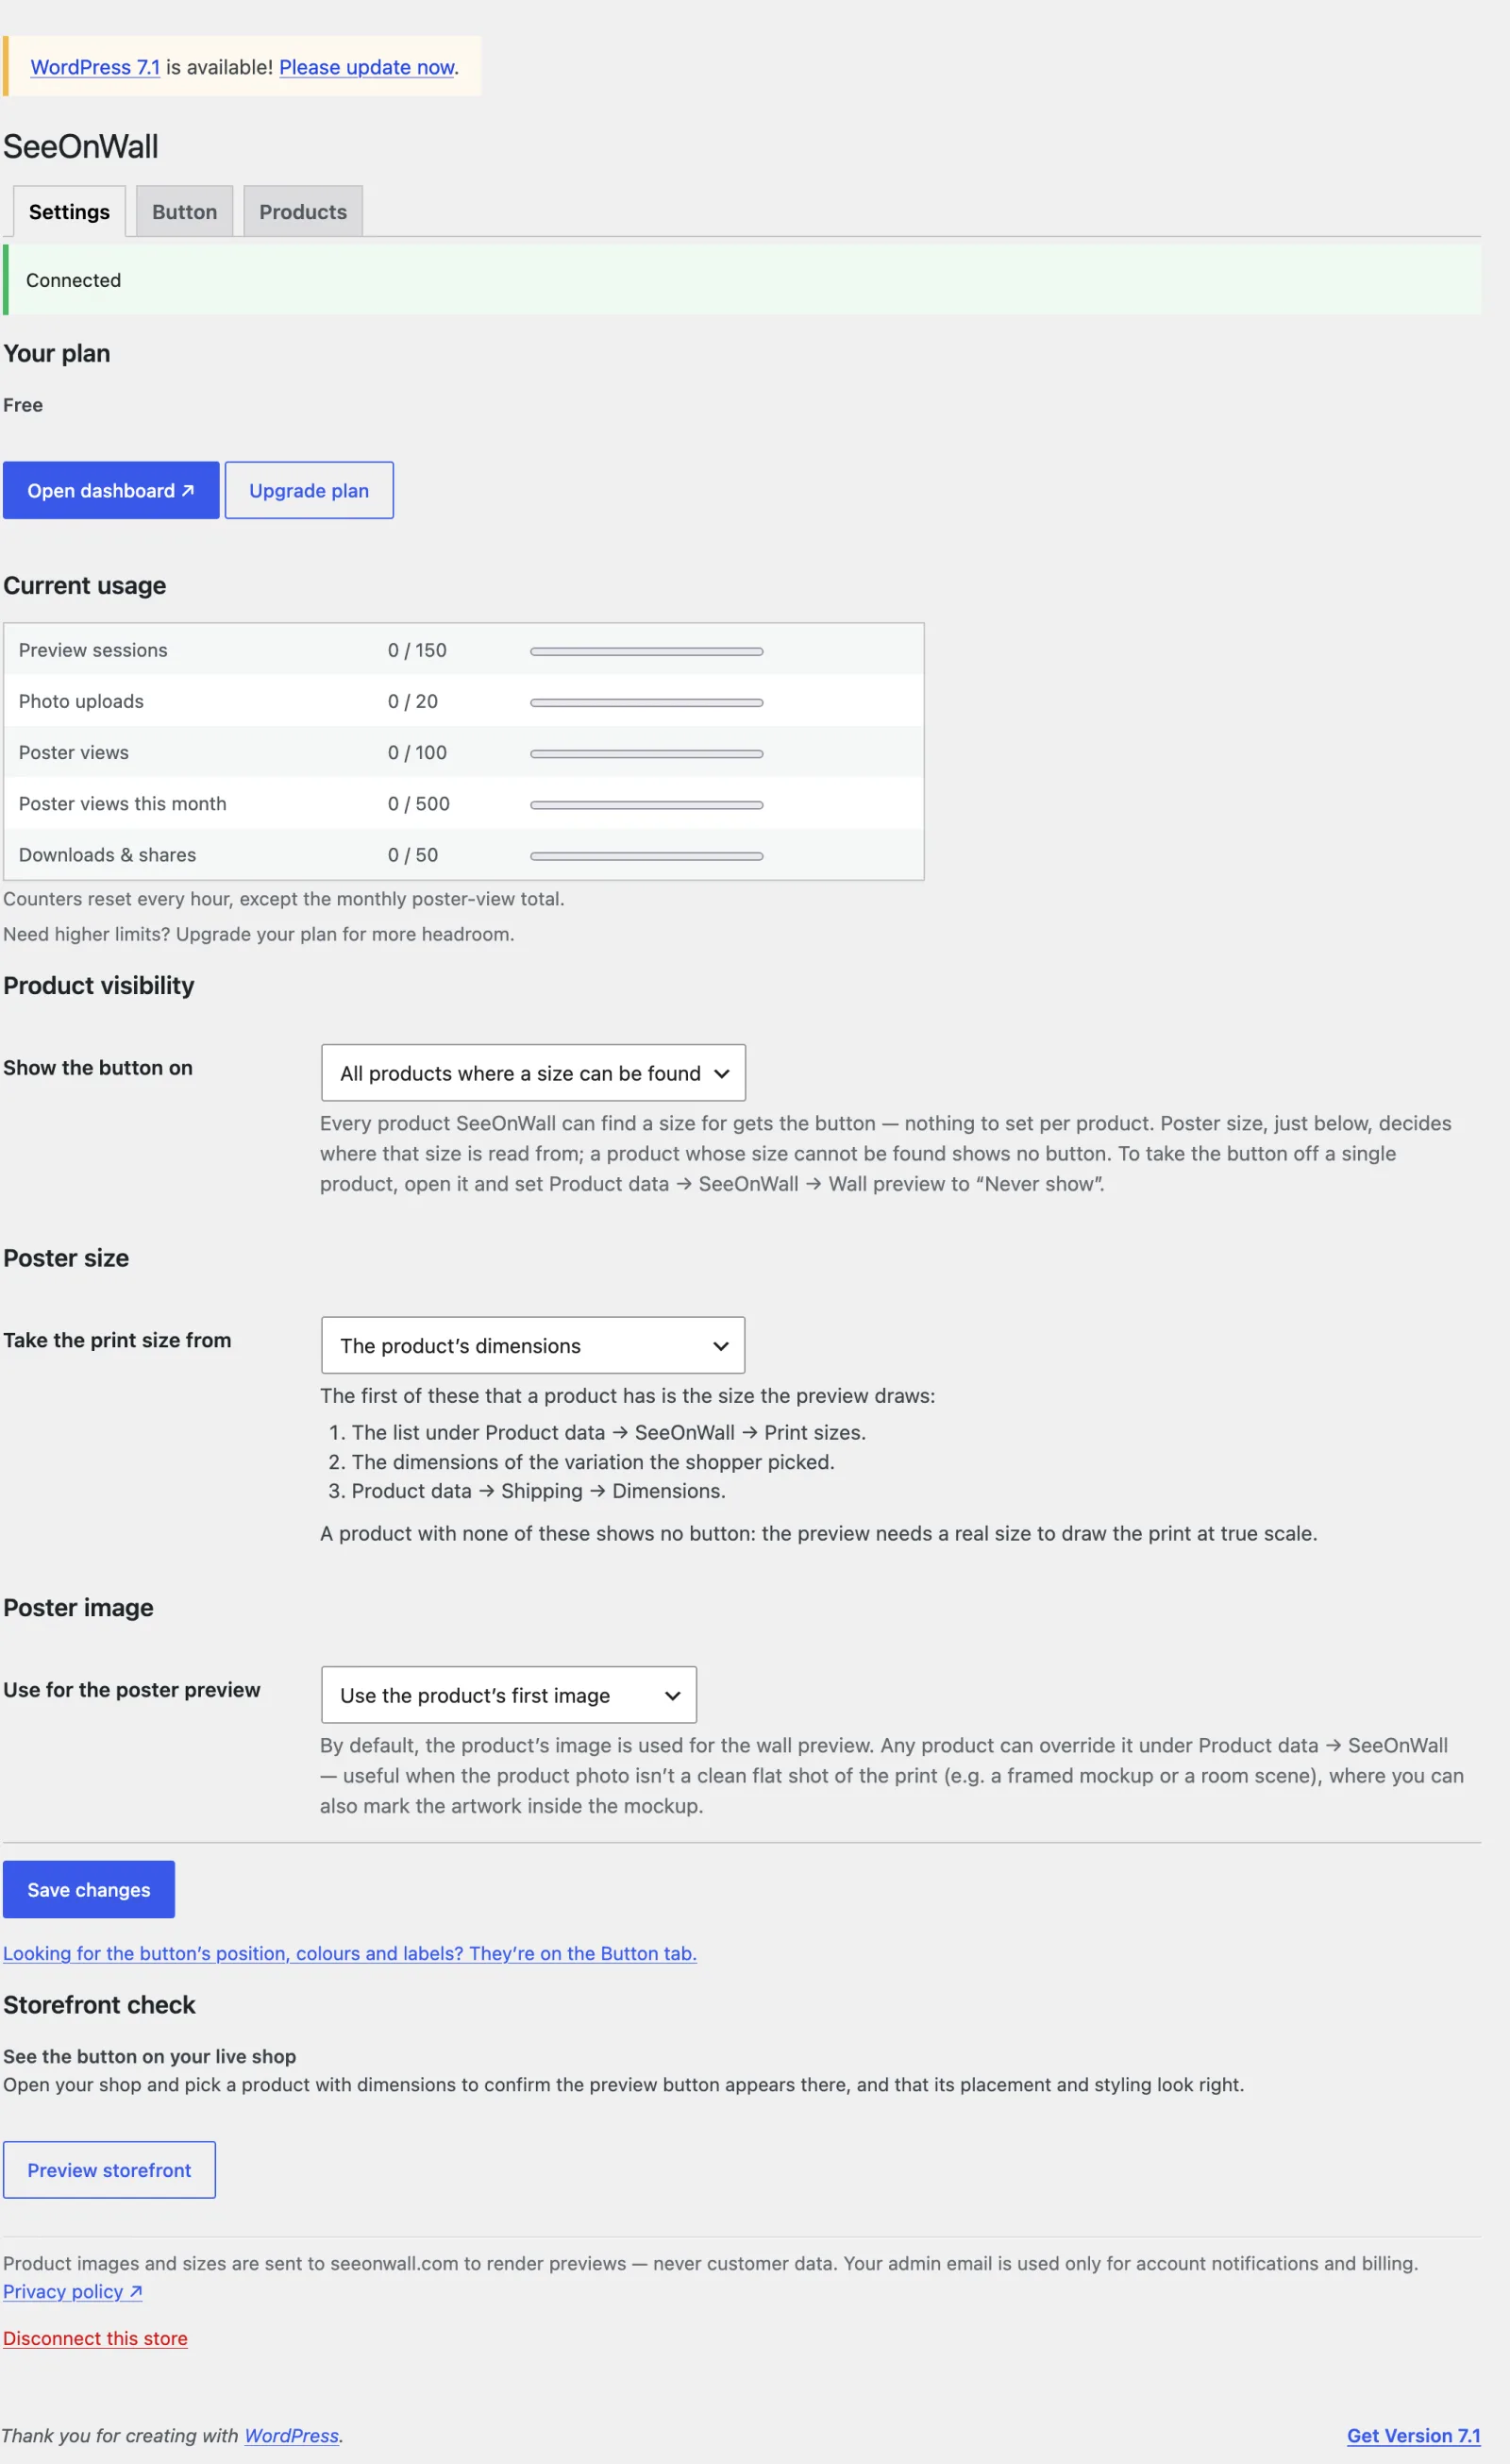
Once the store is connected, WooCommerce → SeeOnWall opens on three tabs: Settings, Button and Products. Settings covers your plan, your usage, and the rules that decide which products get a preview and what size and image it uses.
- Your plan
- Shows the tier you are on. Open dashboard takes you to billing, invoices and account details on seeonwall.com; Upgrade plan is there for when you need more headroom.
- Current usage
- Five live counters: preview sessions, photo uploads, poster views, poster views this month, and downloads & shares. They all reset every hour, except the monthly poster-view total.
- Product visibility
- “All products where a size can be found”, the default, puts the button on every product SeeOnWall can size — nothing else to configure. Switch to “Only products with the preview enabled” to opt each product in by hand instead.
- Poster size
- Three choices, and the screen lists the sources in the order they are tried, so you can tell what any given product will use. “The product’s dimensions” reads Product data → Shipping → Dimensions, or those of the variation the shopper picked. “The size field on the product page” reads the field shoppers choose a size in — options that read like
60x40cm,18x24inorA4supply the size — and falls back to Dimensions when no field can be read. “The size field on the product page, only” never falls back, for shops whose Dimensions measure the tube the print is posted in. A list under Product data → SeeOnWall → Print sizes outranks all three. - Poster image
- By default the product’s first image is used for the preview, and any product can override that in its own panel. Choose “Only an image chosen per product” to ignore the gallery entirely and preview only images you picked by hand.
- Storefront check
- Preview storefront opens your shop, so you can confirm the button really does appear on a product page, in the right place and the right colours.
Button tab
Where the “See on your wall” button sits, how it looks, and what it says. Everything on this tab applies to the whole shop.
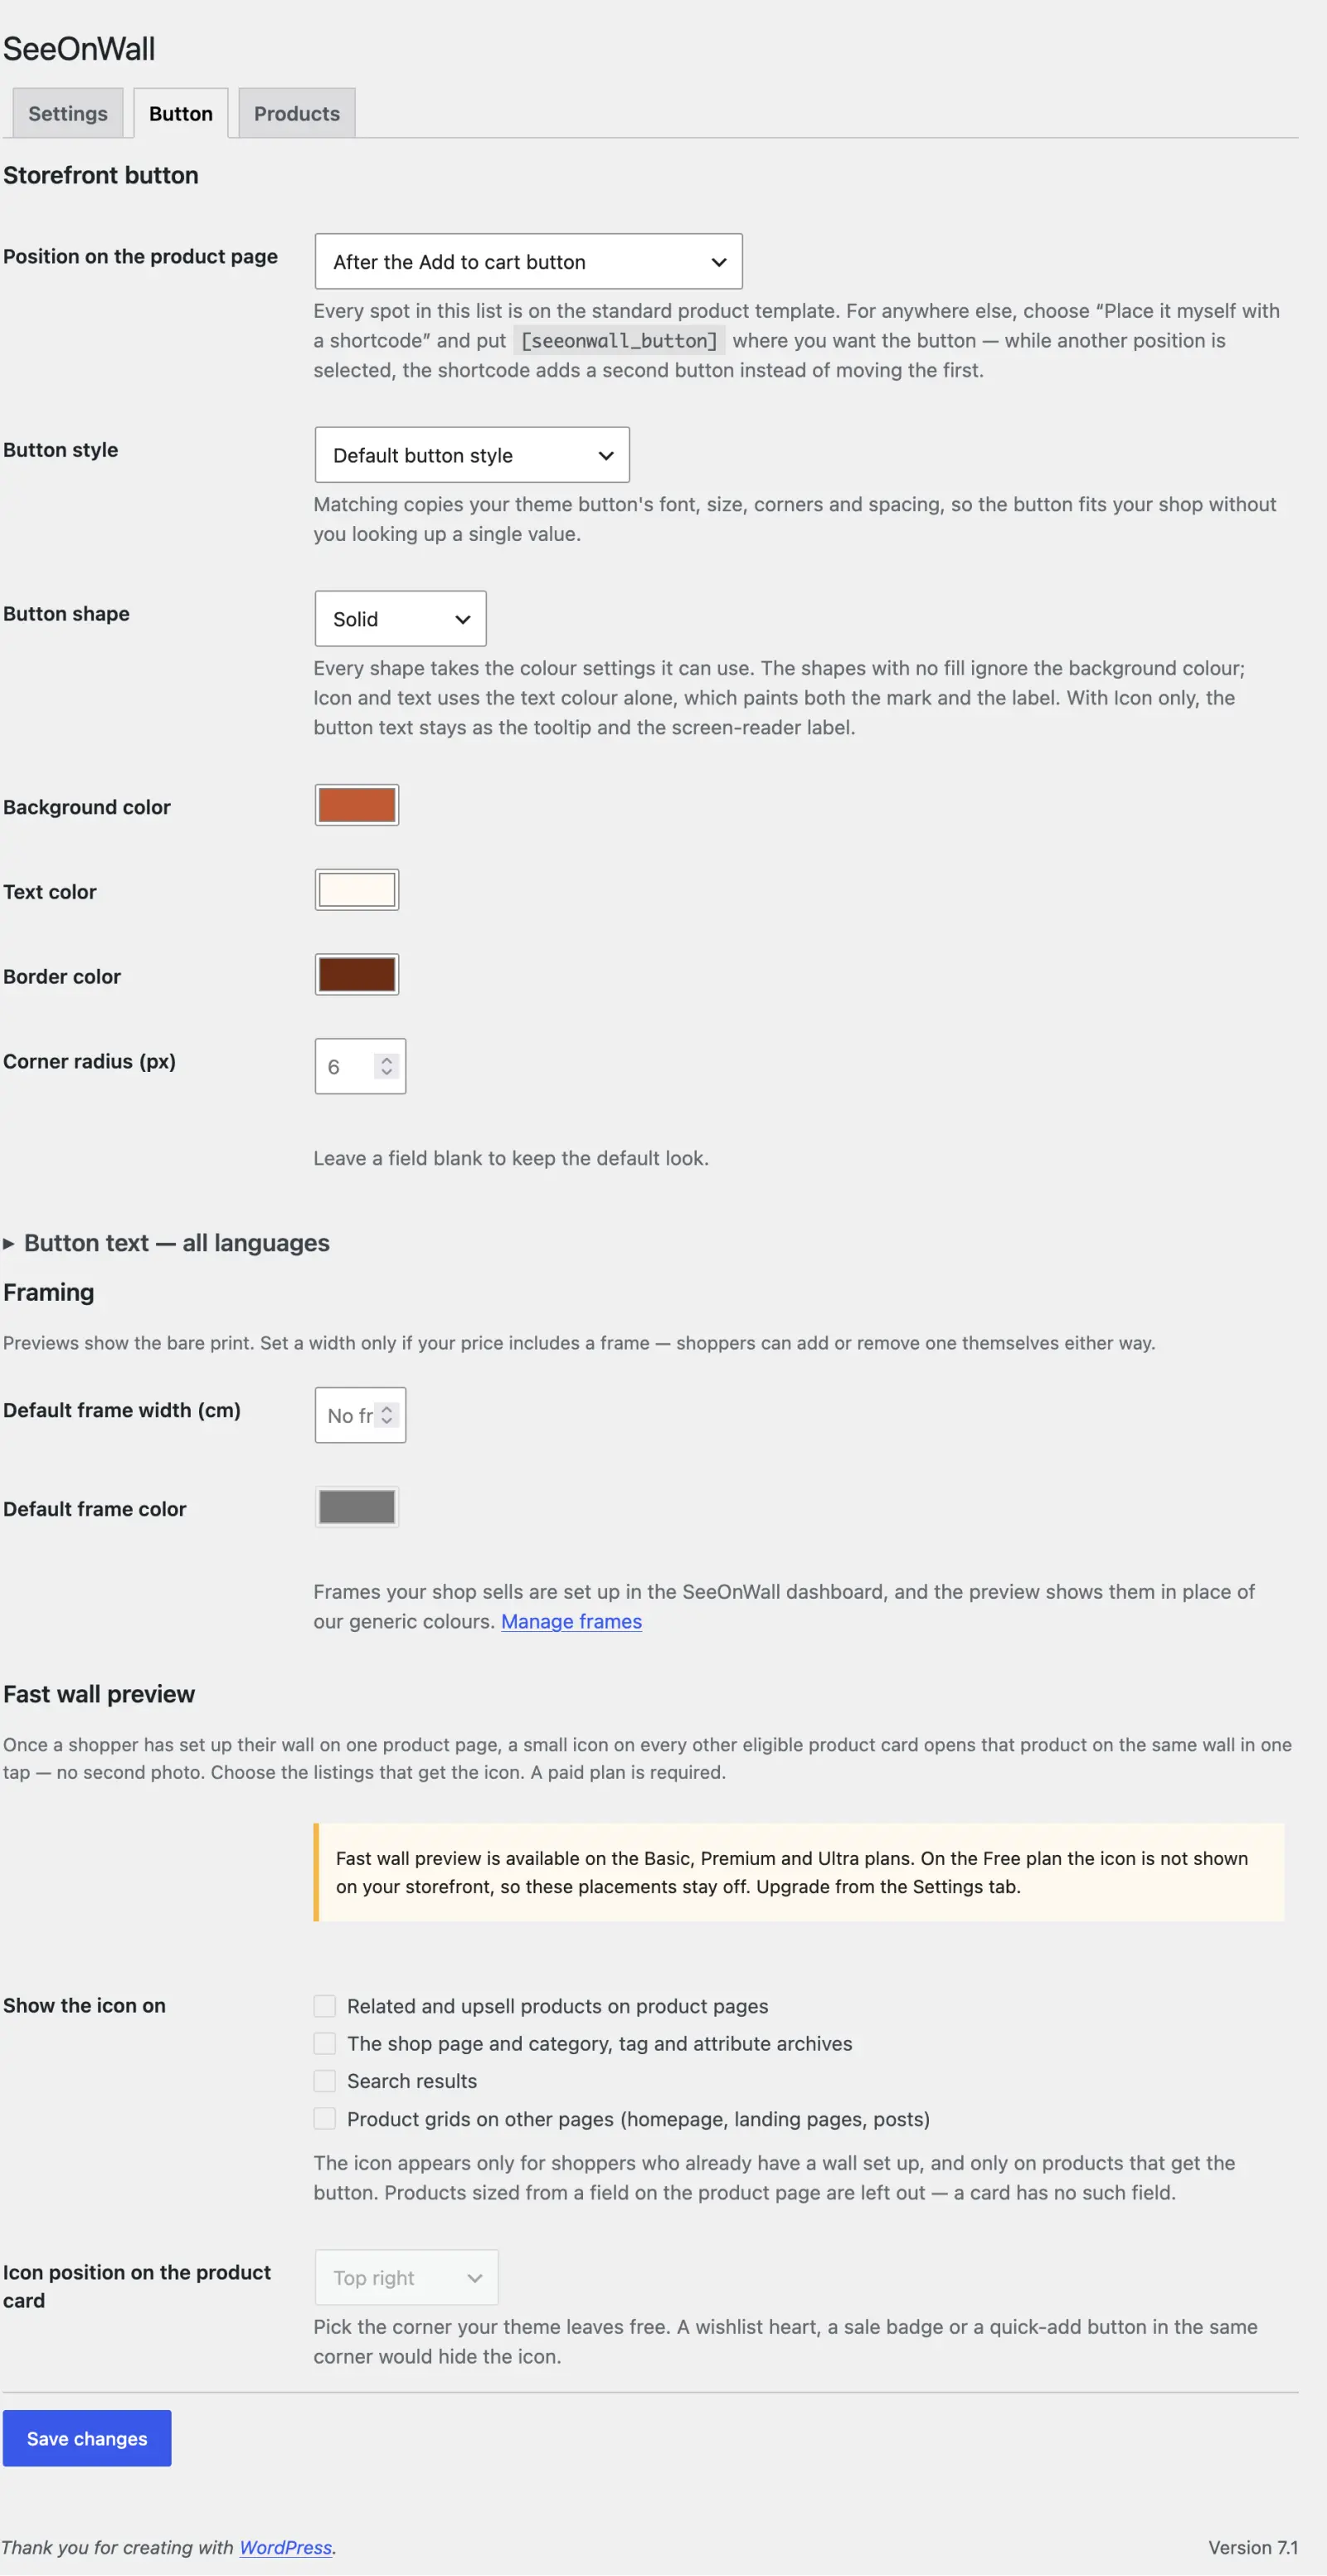
- Position on the product page
- Every spot in the list is on the standard product template — before or after Add to cart, after the description, and so on. For anywhere else, choose “Place it myself with a shortcode” and put
[seeonwall_button]where you want it. Off a product page, name the product:[seeonwall_button id="123"]. - Button style
- “Match my Add to cart button” copies your theme button’s font, size, corners and spacing, so the button fits your shop without you looking up a single value. “Default button style” uses SeeOnWall’s own instead.
- Button shape
- Solid, Outline, Icon and text, or Icon only. Each shape takes the colour settings it can use: the shapes with no fill ignore the background colour, and with Icon only the button text stays as the tooltip and the screen-reader label.
- Colours and corners
- Background, text and border colour pickers, plus a corner radius in pixels. Leave a field blank to keep the default look.
- Button text — all languages
- Shoppers see the button in the language of the page they are on. Set the exact wording per language here — one field each — and leave any of them empty to keep the built-in wording for that language.
- Framing
- Previews show the bare print. Set a default frame width only if your price includes a frame; shoppers can add or remove one themselves either way. Frames your shop actually sells are set up in the SeeOnWall dashboard, and the preview then shows those in place of the generic colours.
- Fast wall preview
- Once a shopper has set up their wall on one product page, a small icon on every other eligible product card opens that print on the same wall in one tap — no second photo. Tick the listings that get the icon (related products, the shop and category pages, search results, product grids on other pages) and pick the corner of the card your theme leaves free. Off by default, and it needs a paid plan; every preview opened this way is one poster view from the same allowance as the full preview.
Products tab
Your whole catalogue, and for each product whether shoppers get the button on it. This is the fastest way to see what is live and what is not.
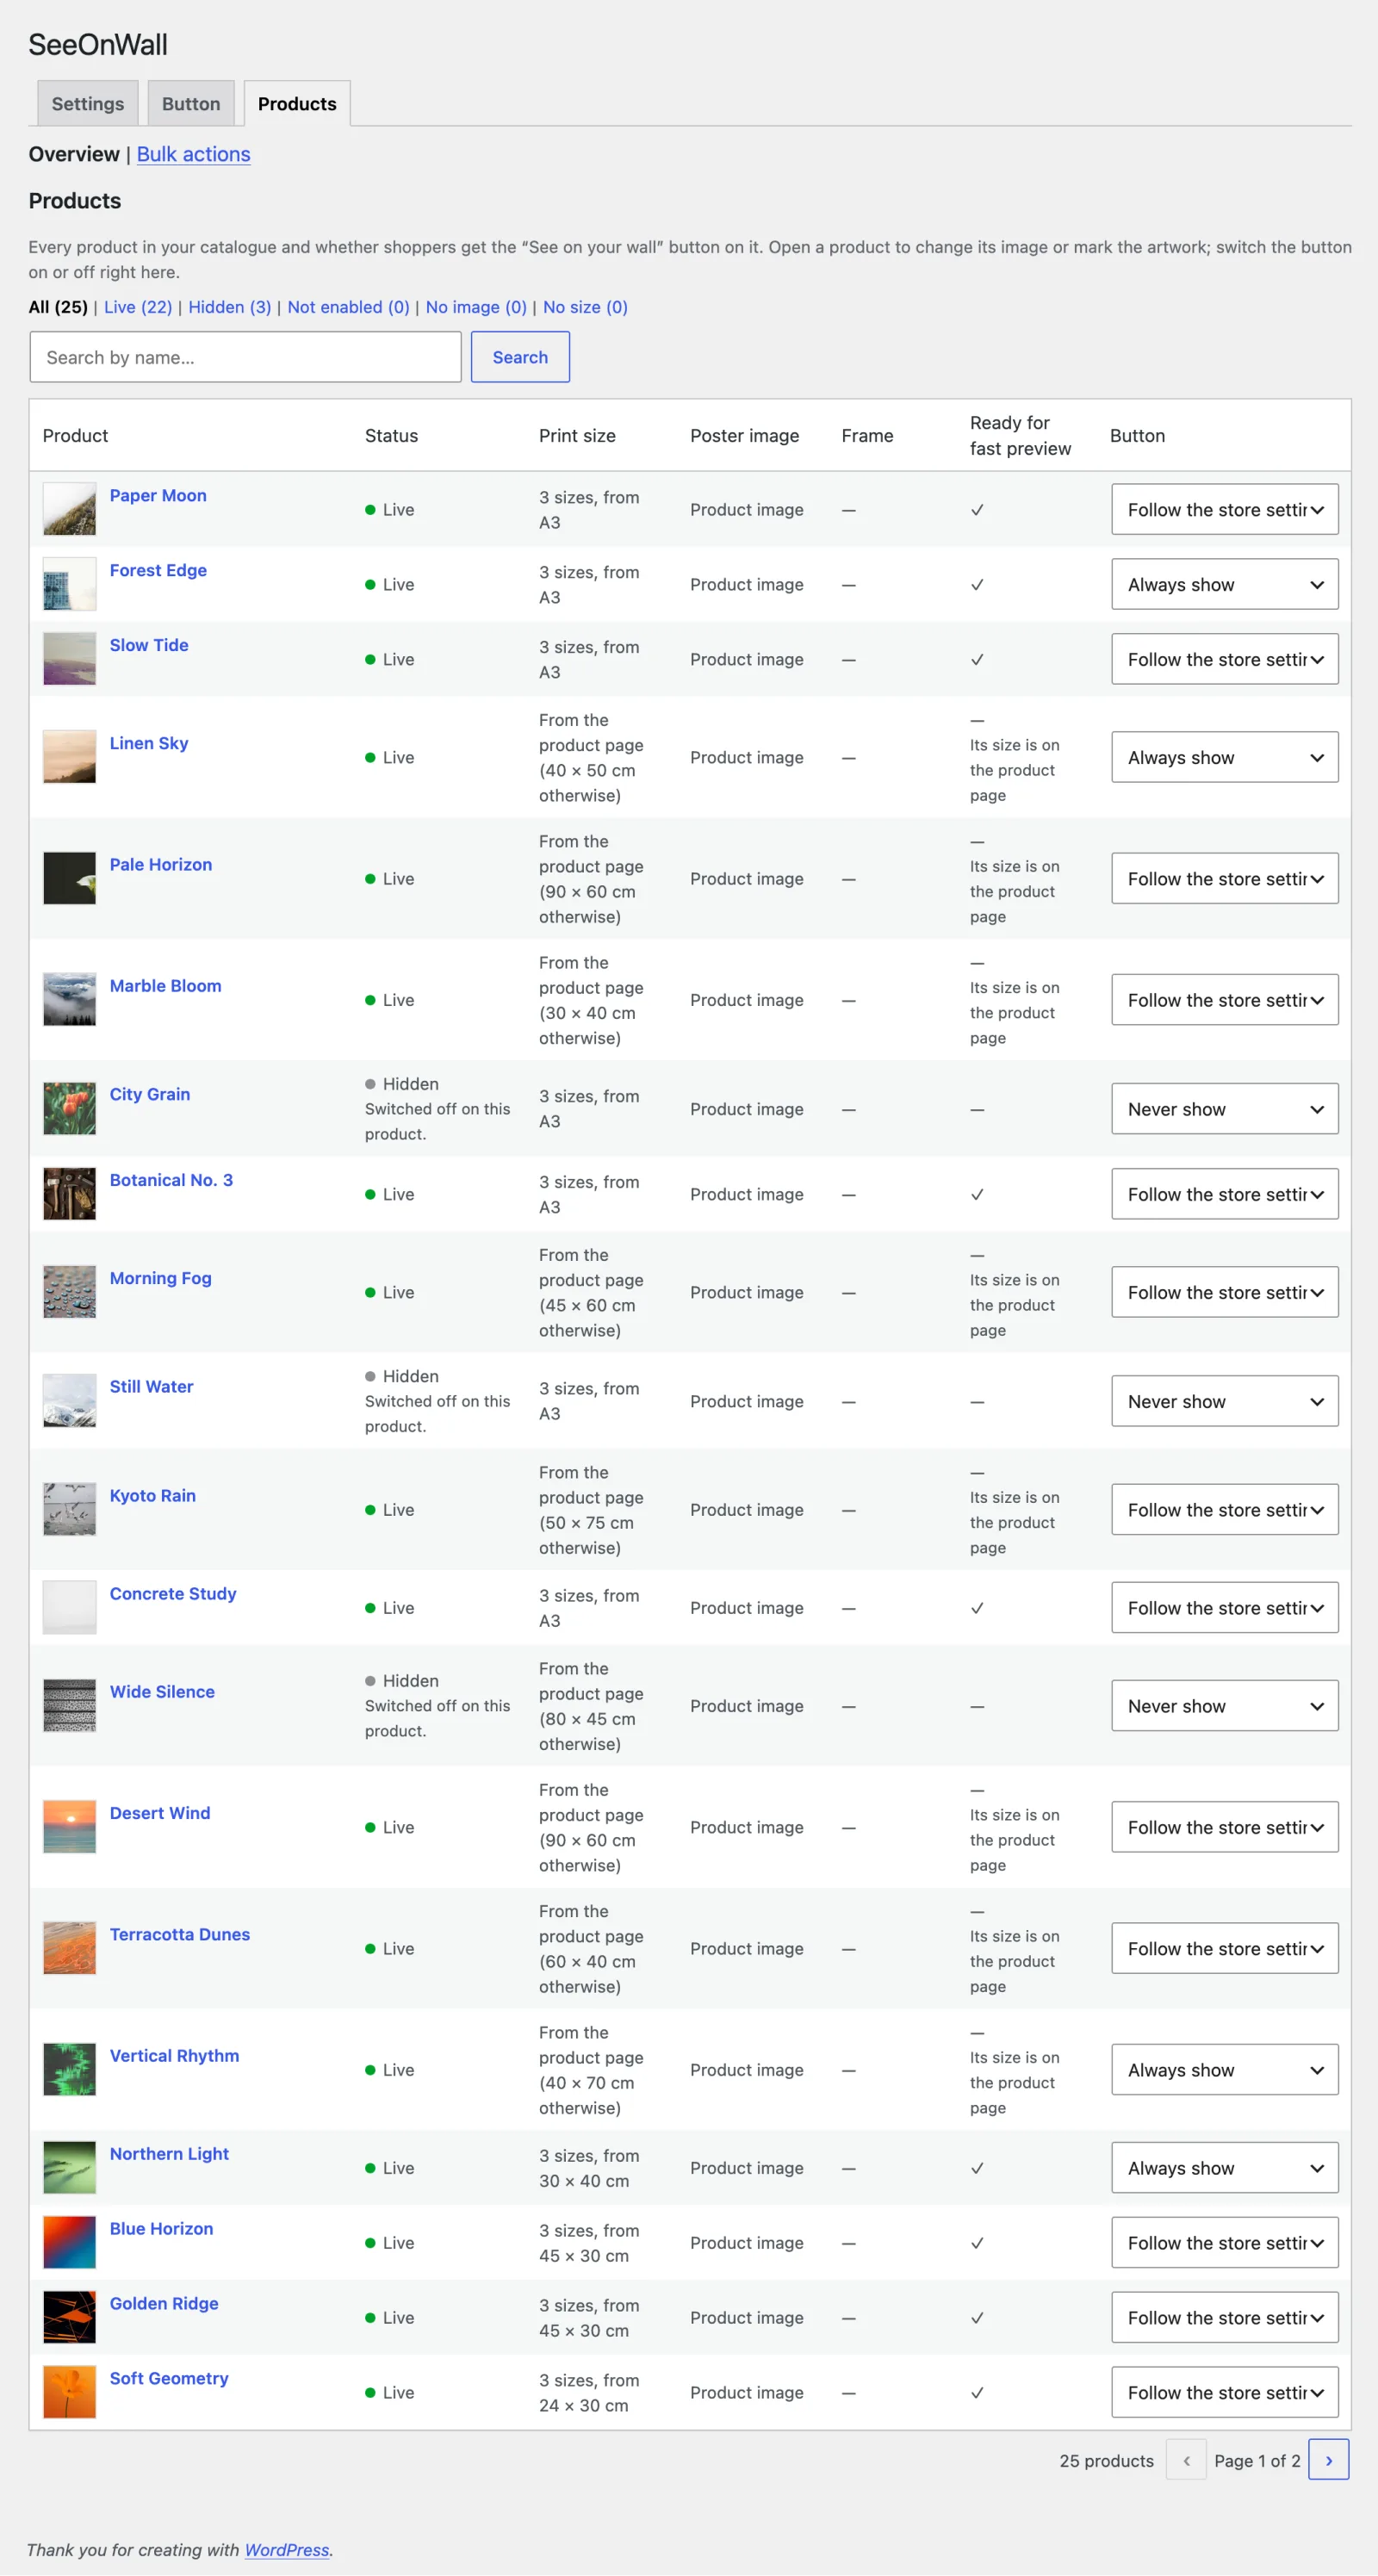
- Status at a glance
- The counts across the top split the catalogue into Live, Hidden, Not enabled, No image and No size. Click one to filter down to just those products, or search the catalogue by name.
- What each row tells you
- The print size, poster image and frame that product will preview with, plus its status and the reason behind it — “No width and height on the product or its variations”, for example. Where the fast wall preview is switched on, a “Ready for fast preview” column says which products also open from a product card.
- Switch the button on or off
- The Button column on every row is a dropdown: Follow the store setting, Always show, or Never show. It saves as soon as you change it. Open the product itself when you need to change its image, sizes or artwork area.
Bulk actions
Set print sizes, or switch the wall preview on and off, across many products at once. Every run is reviewed before anything is written.
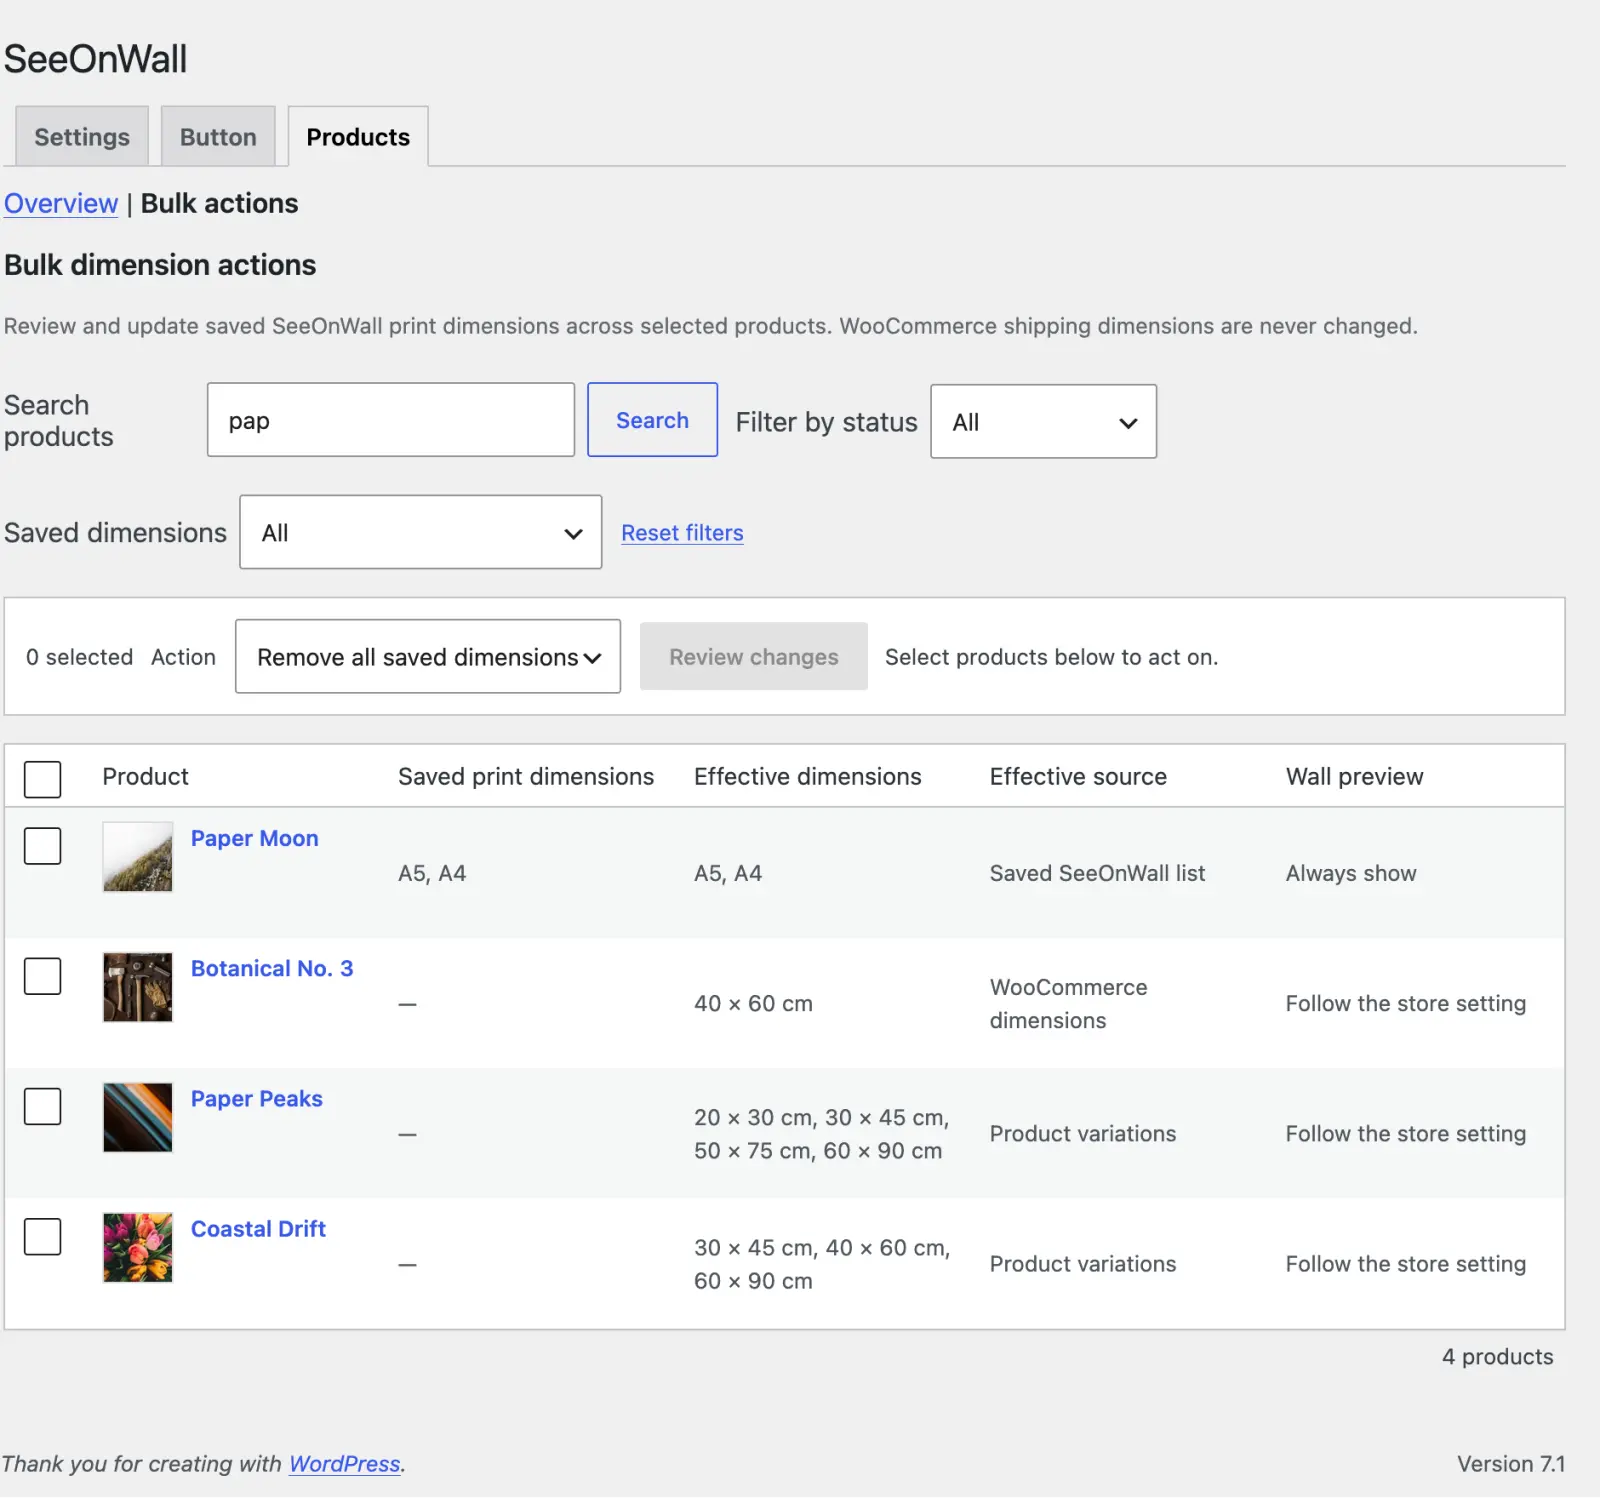
- Choosing what to act on
- Search by name, filter by status, or filter by a saved size — the size box takes the same spellings as everywhere else, so
a4finds the products stored as A4 and the ones stored as 21x29.7 alike. Tick the products you want, up to 100 at a time. - What you can change
- Print dimensions offers Add, Replace and Remove, all of which write only the SeeOnWall list — WooCommerce shipping dimensions are never touched. Wall preview turns the button on or off for the selected products, or hands them back to the store setting. The Wall preview column shows what each product is set to now.
Dimension presets
A named set of sizes you apply again and again — the A-series you sell, or the three sizes every print comes in.
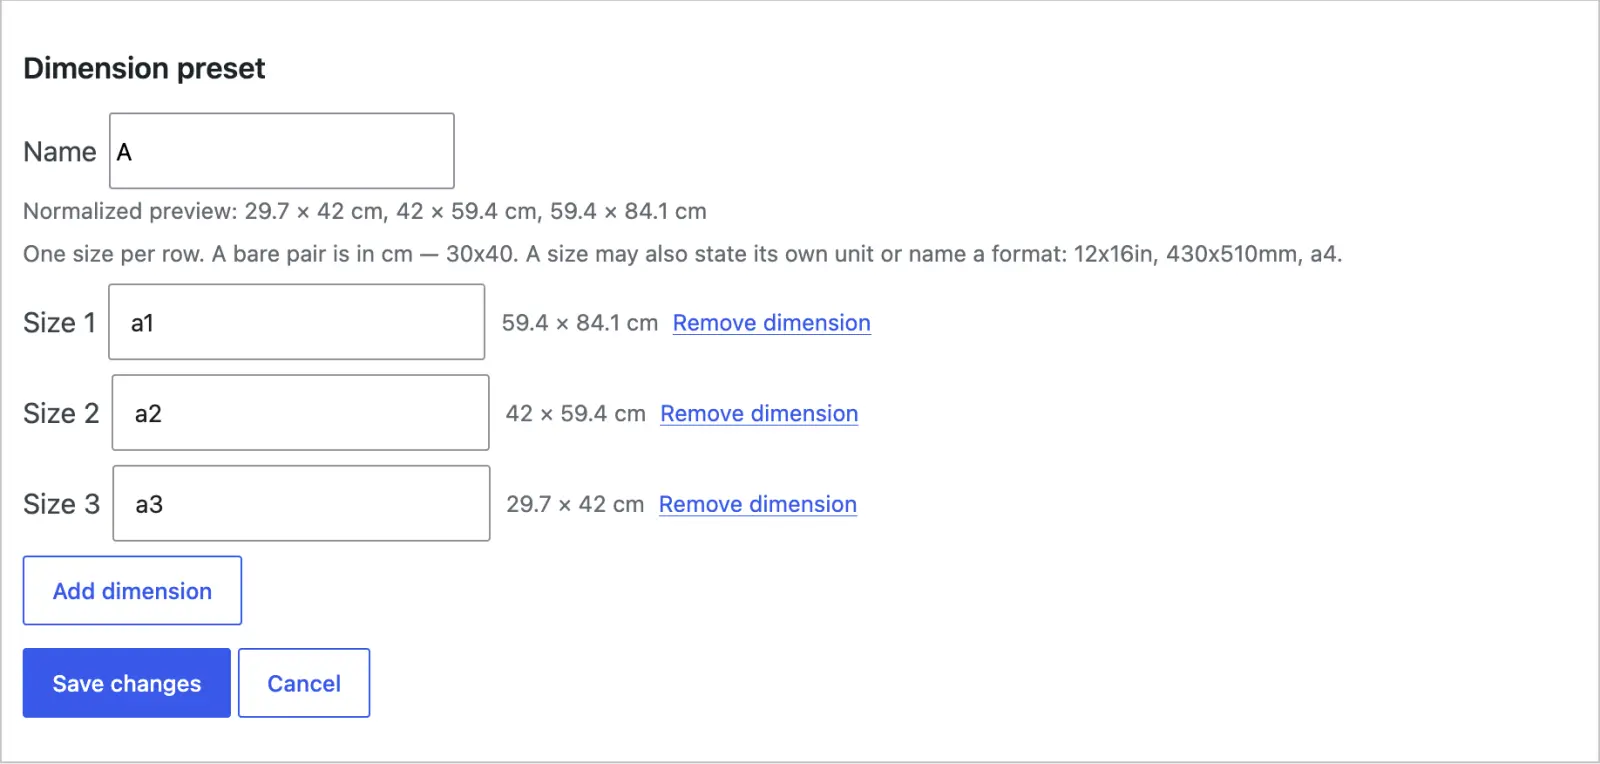
- Writing a size
- One size per row. A plain pair like
30x40is read in your store’s dimension unit. A size can also state its own unit or name a format —12x16in,430x510mm,a4— and each row shows the centimetres it works out to. A named format stays named: shoppers see an **A4** size button rather than 21 × 29.7 cm. - Creating and editing
- Presets are stored in your WordPress site, not in your SeeOnWall account, and are never sent anywhere. New preset builds one from scratch; on the Products tab, a product that already has the sizes you want offers Create preset to copy them.
Reviewing before you apply
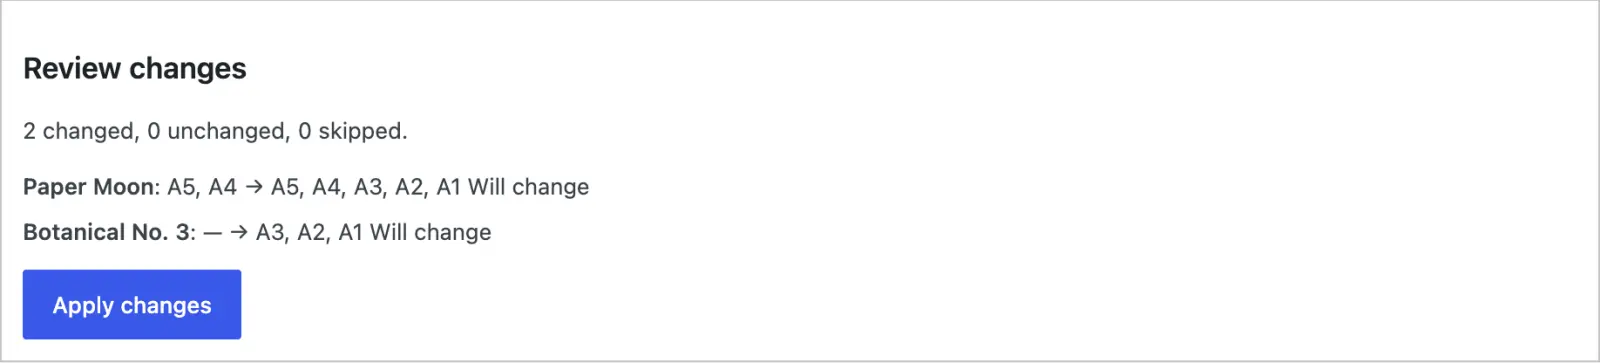
Nothing is written until you confirm. Review changes shows the before and after for every selected product.
- Reading the review
- Each line reads current → result, and says whether that product will change or is already as you want it. The counts at the top total them. The review is the same operation the Apply button runs, asked not to save, so what you see is what you get. Change the selection or the action and the review clears, so nothing unreviewed can be applied.
Product data → SeeOnWall
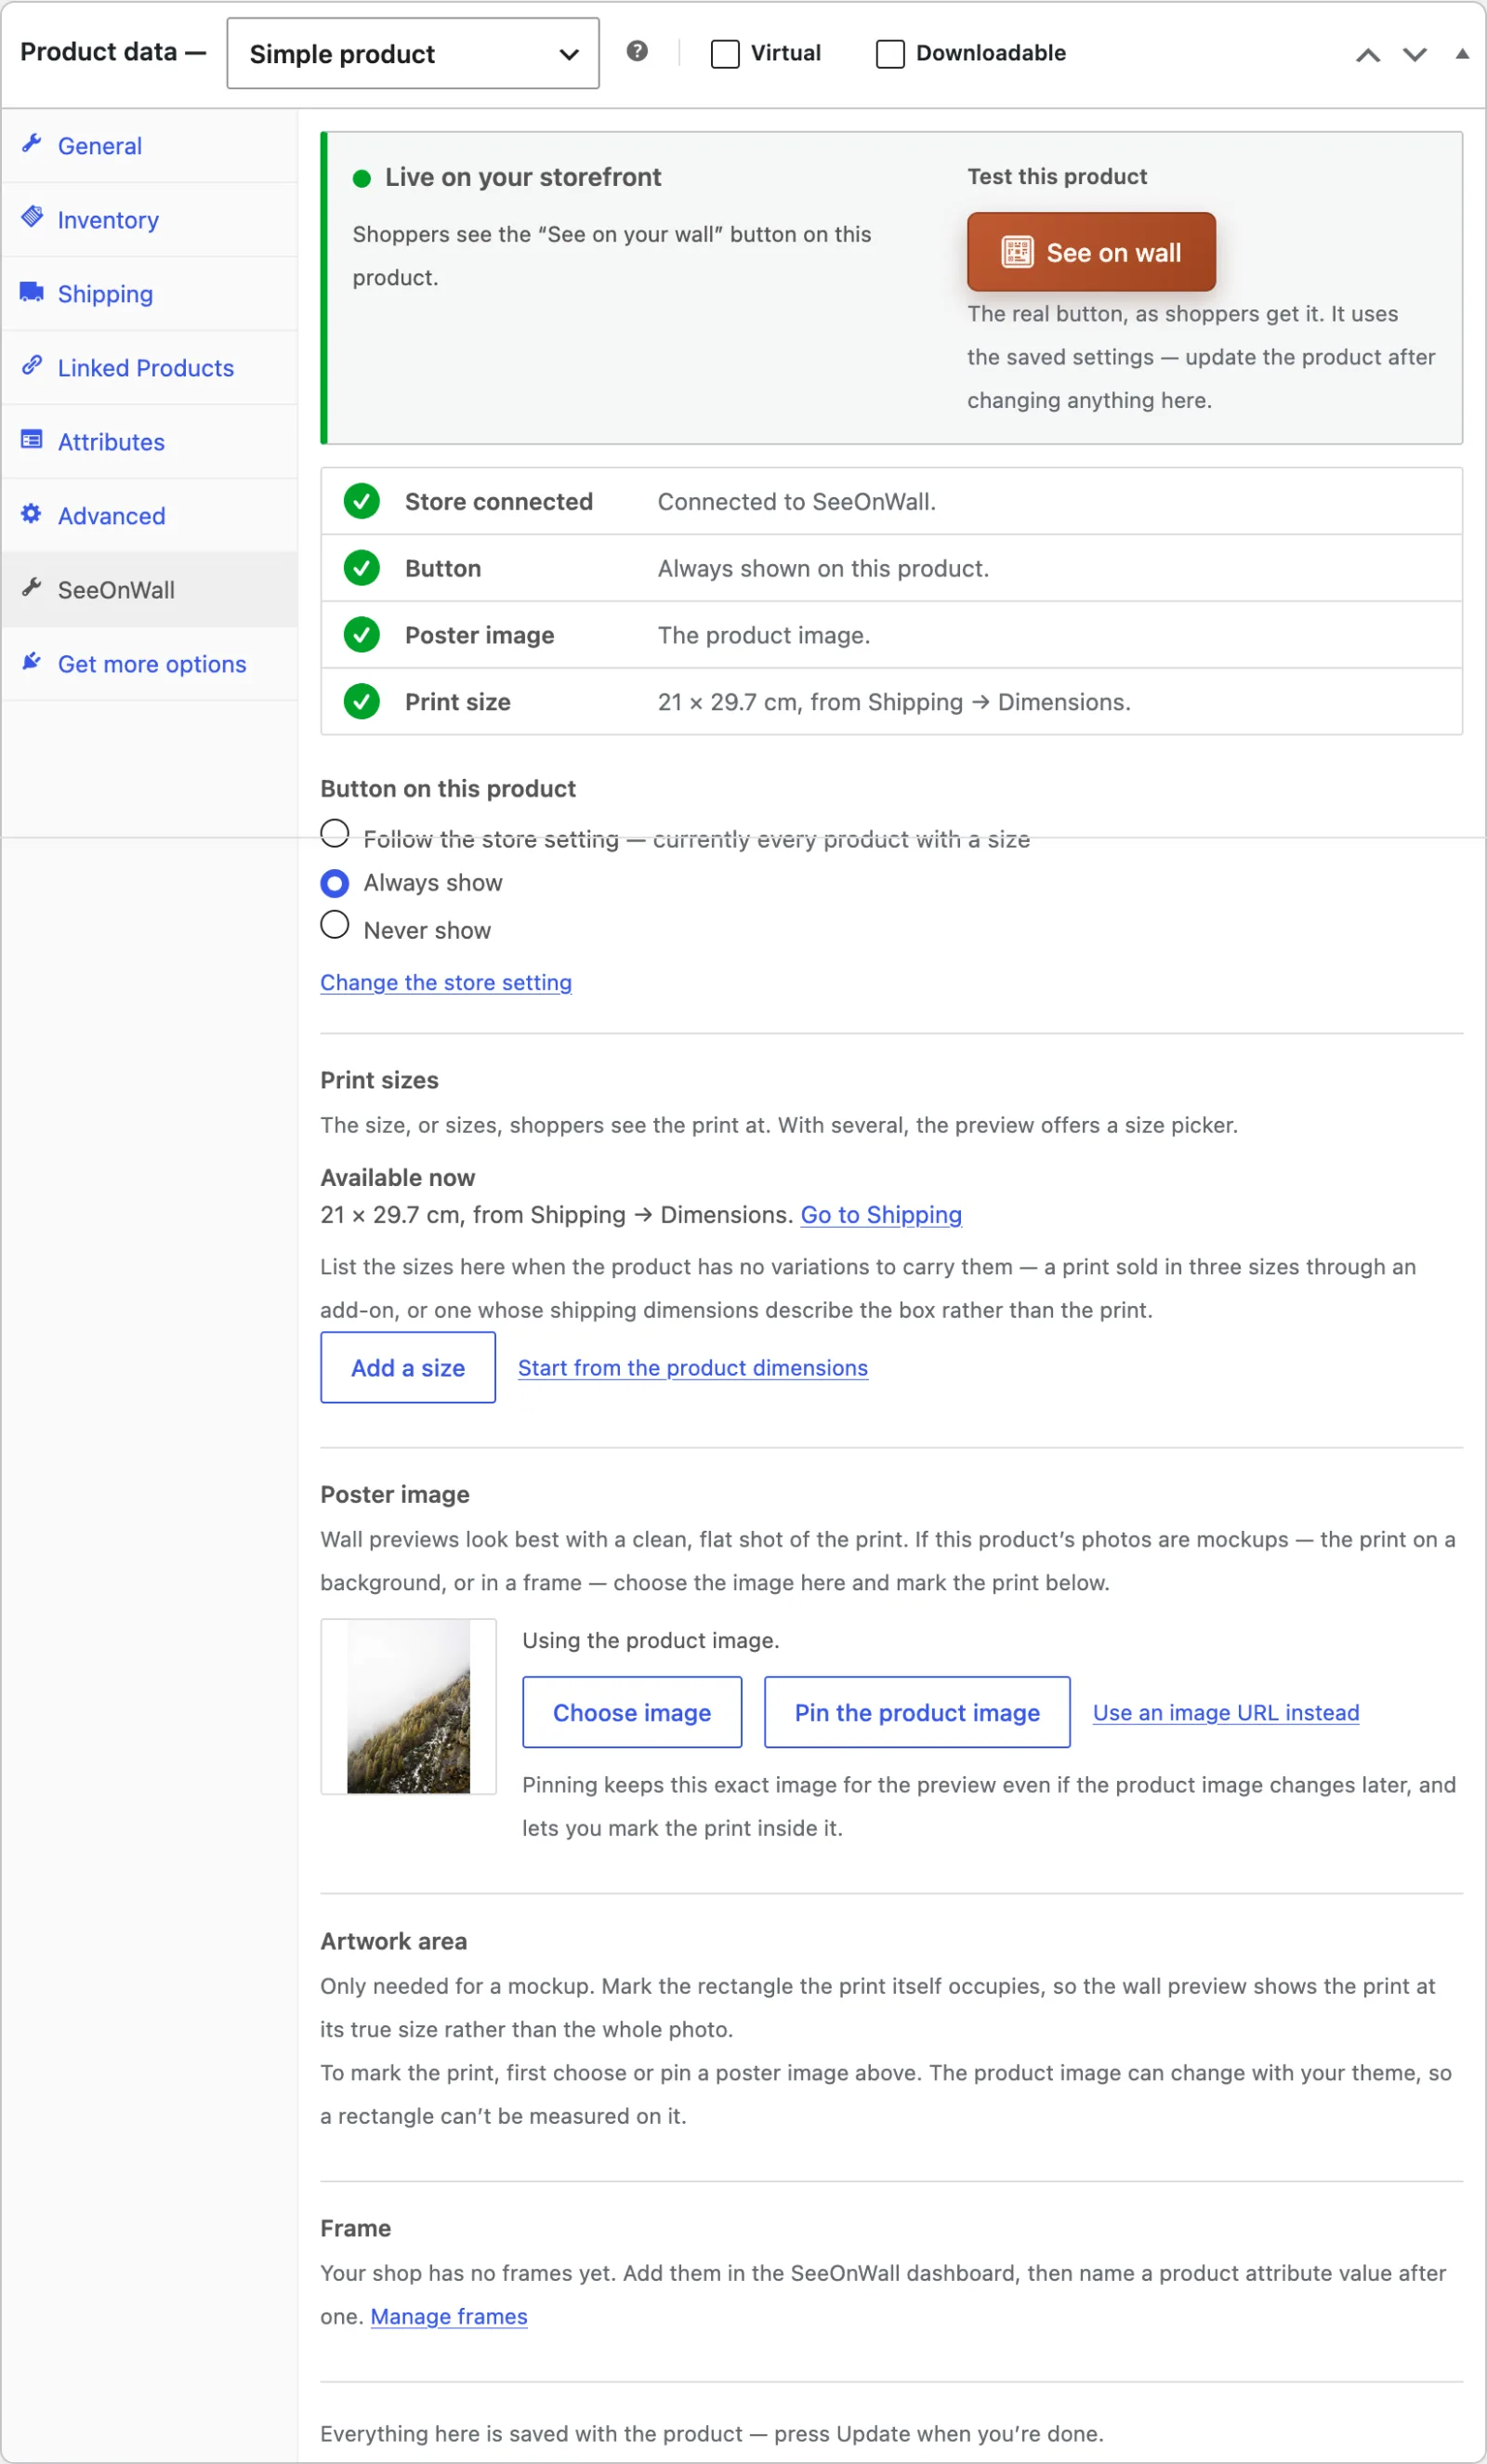
Editing a product adds a SeeOnWall tab to the Product data box, next to General, Inventory and Shipping. Everything a single product can override lives there, and it all saves with the product when you press Update.
- Live on your storefront
- The banner at the top says whether shoppers currently see the button on this product, and names the reason when they do not.
- Test this product
- The See on wall button beside the banner is the real one, exactly as shoppers get it. It uses the saved settings, so update the product after changing anything here before you test again.
- What the storefront checks
- Four rows — store connected, button, poster image and print size — each showing what the storefront will actually use. A row that needs attention links straight to the screen that fixes it.
- Button on this product
- Follow the store setting, Always show, or Never show. It is the same choice as the Products tab offers, with the store’s current rule spelled out next to it.
Print sizes
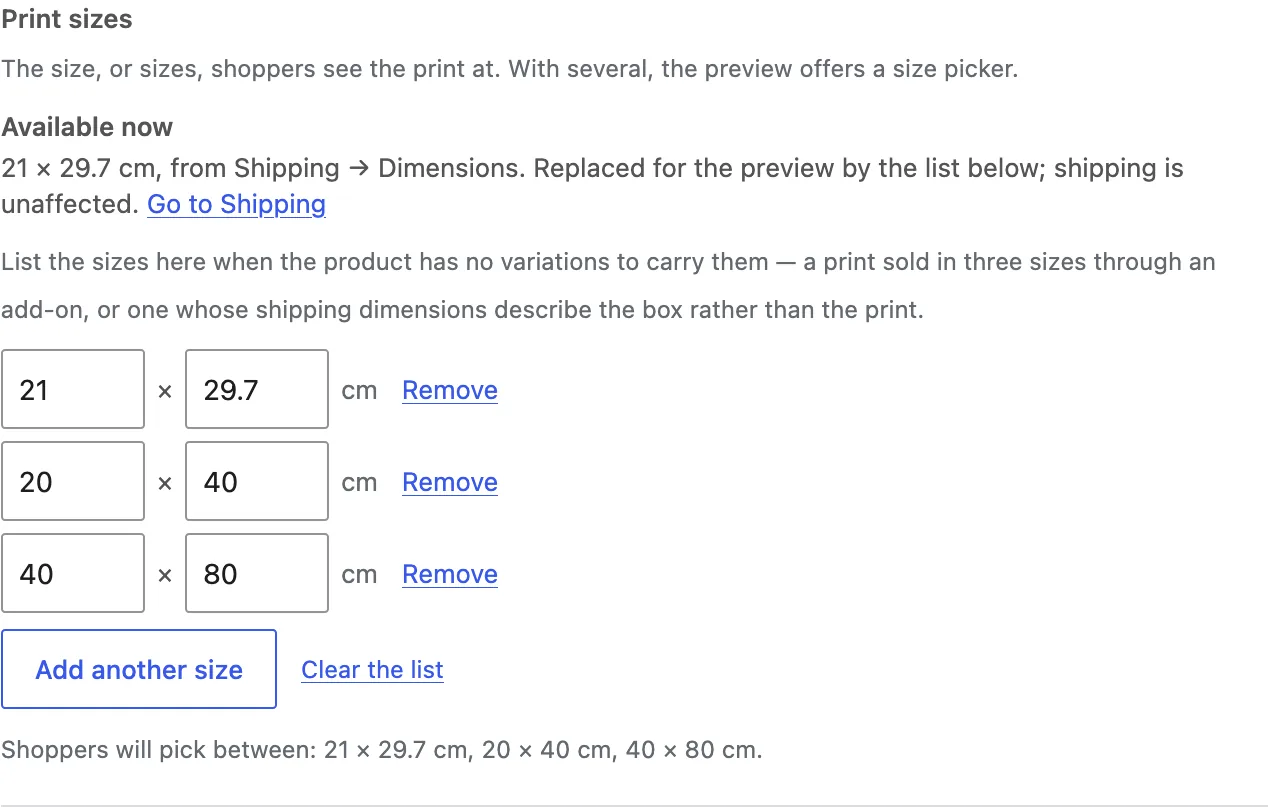
The size, or sizes, shoppers see the print at. With several, the preview offers them a size picker.
- Where the size comes from
- The first of these the product has: the list on this tab, then its variations’ dimensions, then the width and height under Shipping → Dimensions, shown here as “Available now”. Go to Shipping jumps straight to them.
- Listing sizes by hand
- List sizes on this tab when the product has no variations to carry them — a print sold in three sizes through an add-on, or one whose shipping dimensions describe the box rather than the print. A list here replaces the dimensions for the preview only; shipping is unaffected.
- Variable products
- A variable product carries sizes on its variations — each variation’s own width and height. A list on this tab replaces them for the preview; leave it empty to keep using the variations’ dimensions.
Poster image
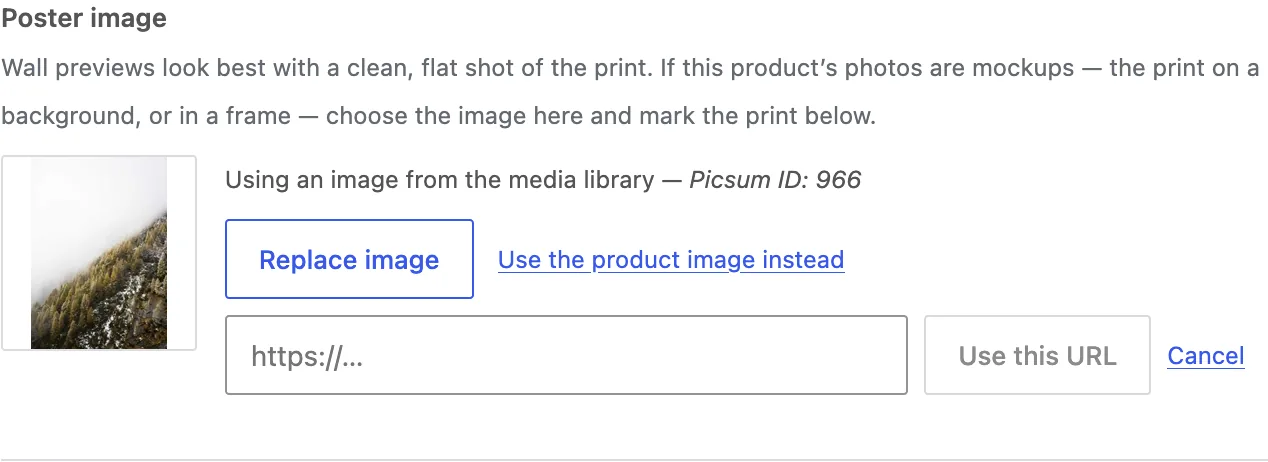
Wall previews look best with a clean, flat shot of the print. When a product’s photos are mockups — the print on a background, or already in a frame — point the preview at a better image here.
- Choose an image
- Pick any image from the media library, or paste an image URL. “Use the product image instead” hands the preview back to the gallery.
- Pin the product image
- Pinning keeps the exact image the product uses today, even if the gallery changes later — and it is what lets you mark the artwork inside that image.
- By URL
- Useful when the print lives on a CDN outside the media library. The URL has to be publicly reachable for the preview to load it.
Artwork area
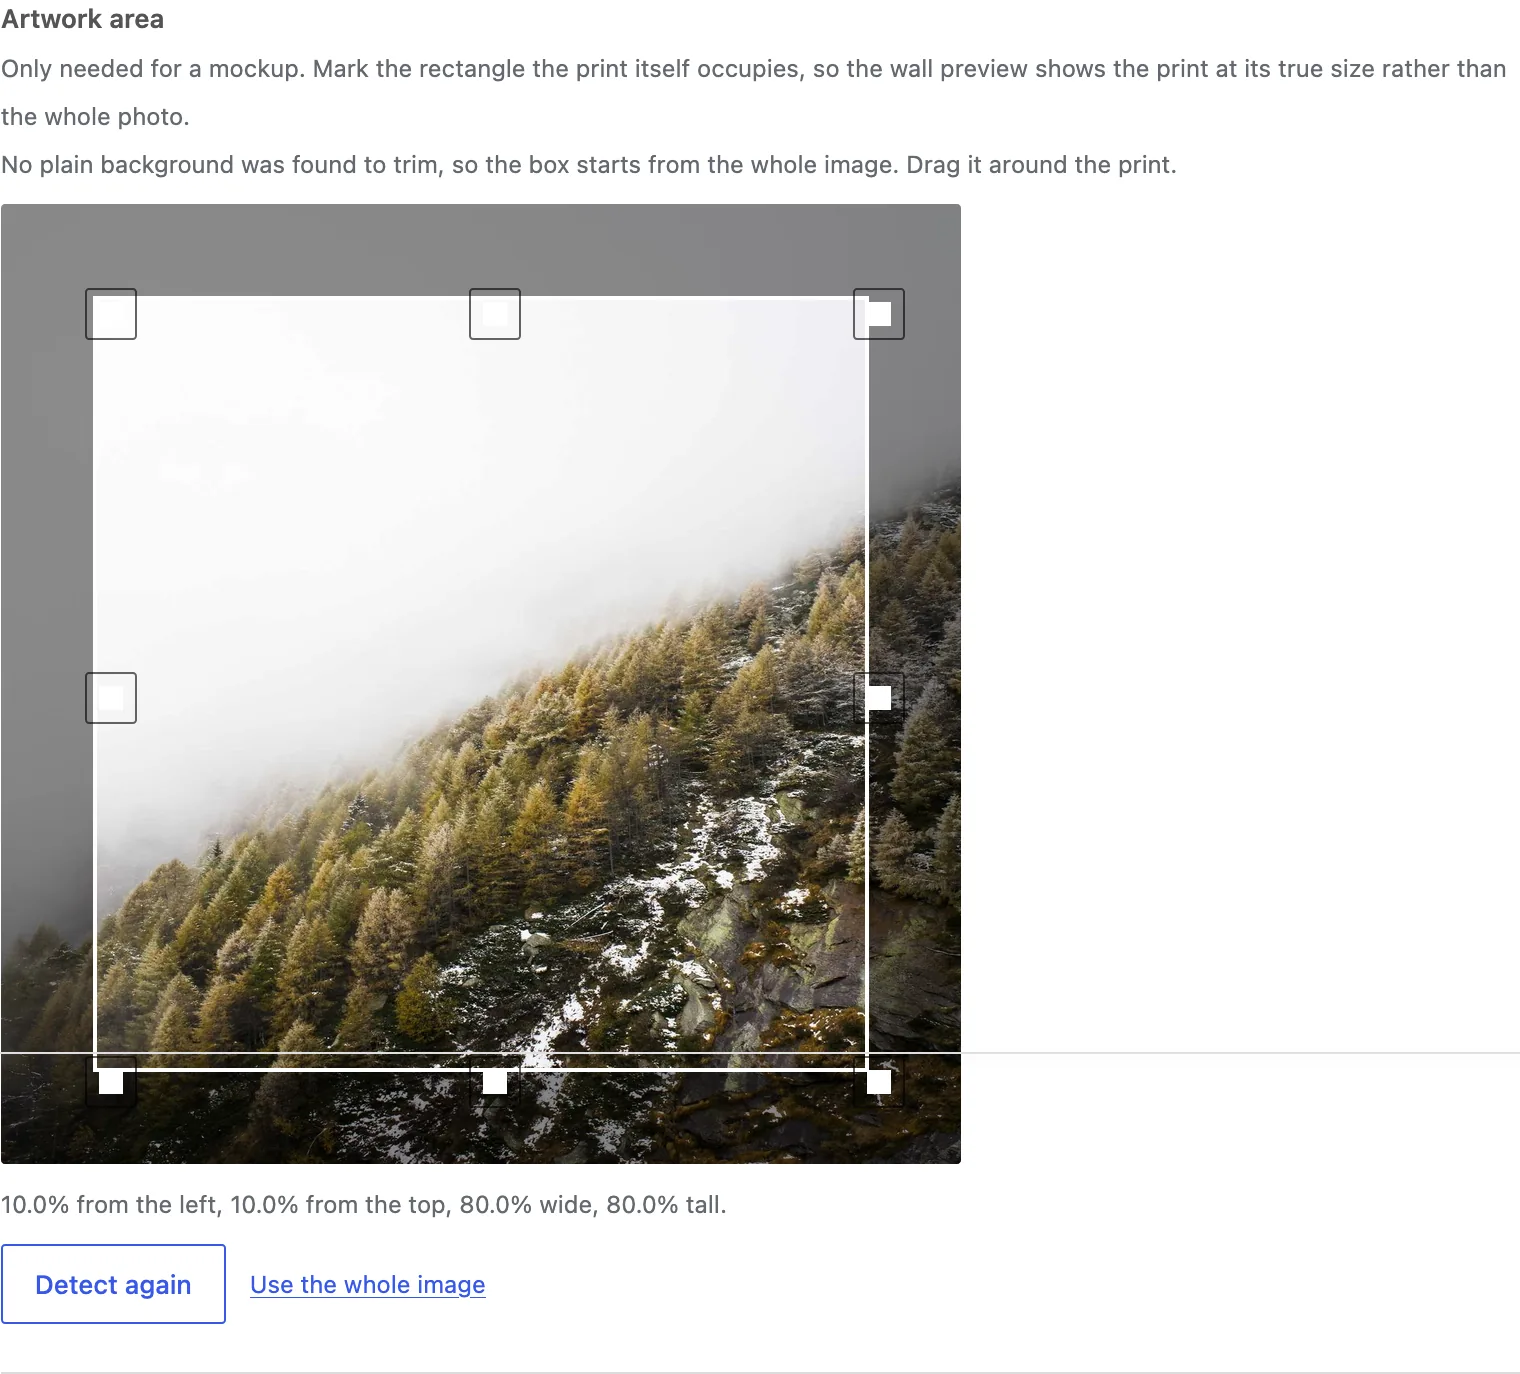
Only needed for a mockup. Mark the rectangle the print itself occupies, so the wall preview shows the print at its true size rather than the whole photo.
- The box is suggested for you
- Opening the editor trims a plain background as a starting point. On a framed mockup that usually finds the frame’s outer edge rather than the print inside it. Detect again re-runs the suggestion, and “Use the whole image” clears the box.
- Drag it into place
- Move the box or pull its handles; arrow keys nudge it. The readout under the image gives the exact percentages it is saved as, so the marking survives any later resize of the image.
- Proportions are checked
- The box is compared against the size the product declares. If the two disagree badly enough that shoppers would see the artwork stretched, the plugin says so and offers to match the print size for you.
Frame
If your shop sells prints in frames, the preview can open in the right one.
- Set your frames up once
- Frames are defined in the SeeOnWall dashboard — name, width and colour. Both the Button tab and the product panel link straight to them.
- Match them by attribute
- Name a product attribute value after one of your frames and the preview opens in it. On a variable product the preview follows the shopper’s choice of variation.
- Or set one default
- No frames set up, or a product without the attribute? The default frame width and colour from the Button tab apply instead. Shoppers can always add or remove a frame themselves.
Check it on your shop
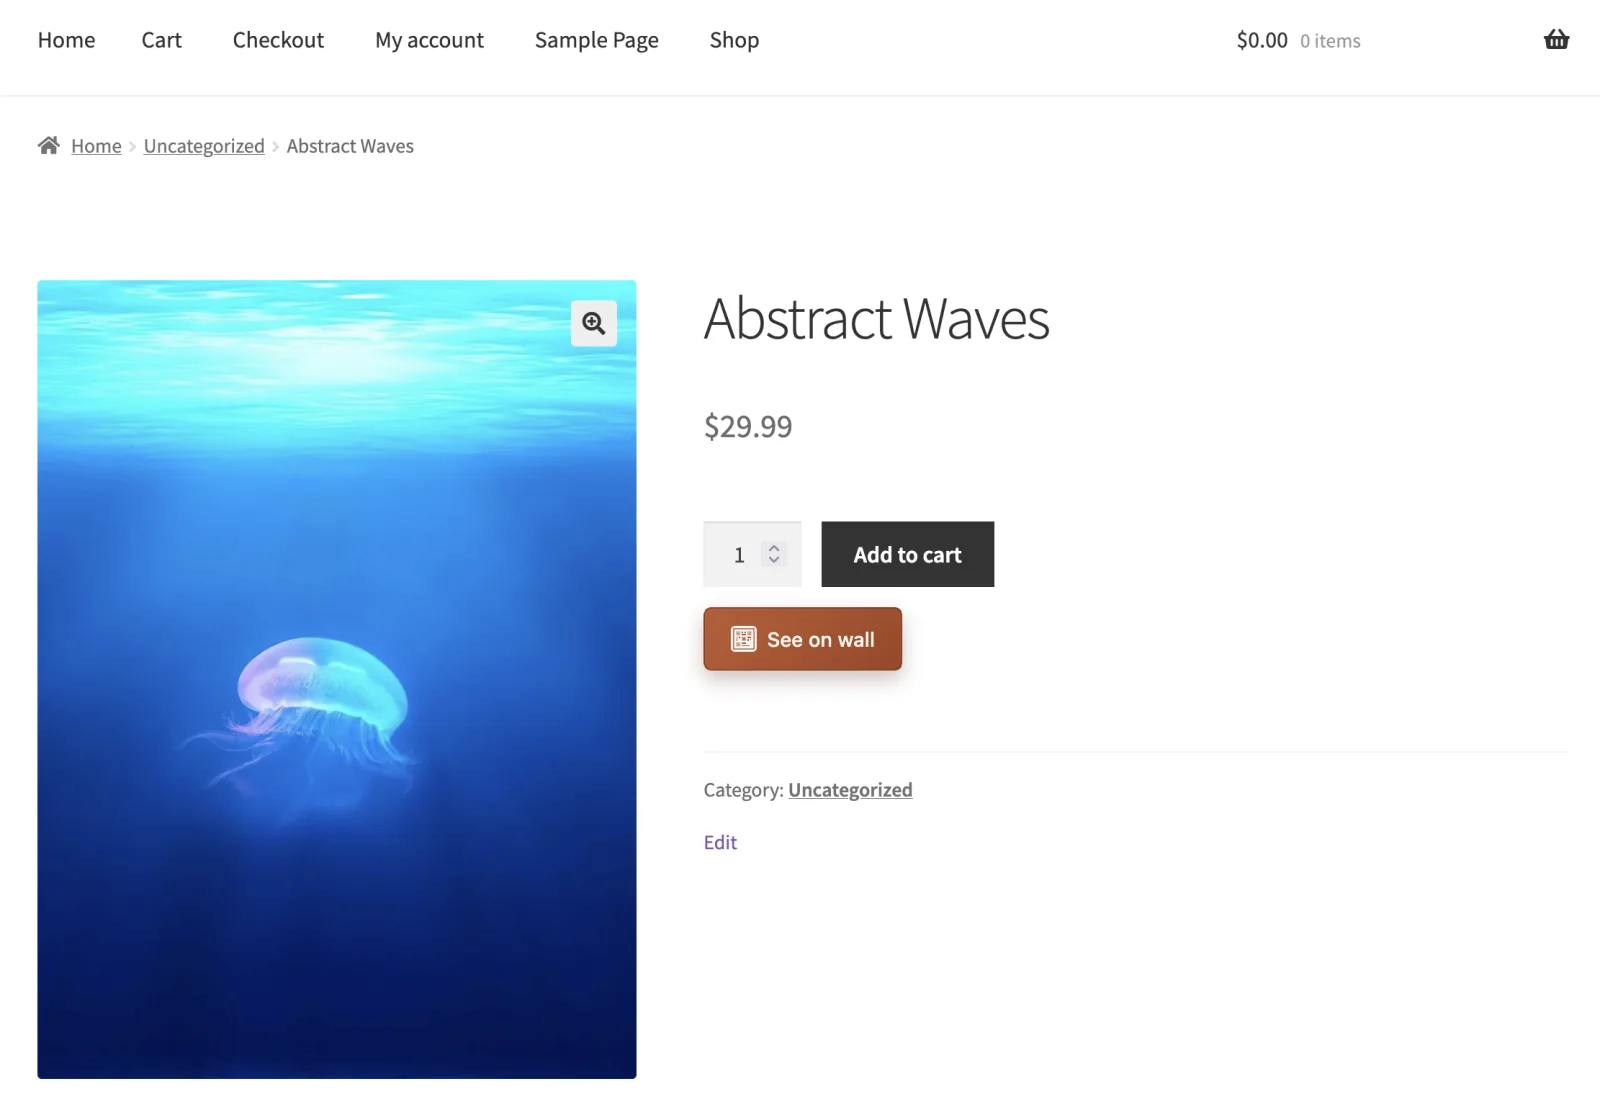
Open a product page the way a shopper would and confirm the button is there, in the right place and the right colours.
- What to look for
- Pick a product that has dimensions. The button should sit where the Button tab puts it, and pressing it should open the preview at that product’s real size.
- Changing many products at once
- Quick edit, bulk edit and a product CSV import all carry the same per-product fields — SeeOnWall preview, image, artwork area and sizes — so a whole catalogue can be set without opening every product.
No button on a product?
The Products tab names the reason for every product in your catalogue. These are the four you will see.
- No size
- The product has no width and height, and none of its variations do either. Fill in Shipping → Dimensions, or list the sizes on the product’s SeeOnWall tab.
- No image
- There is nothing to preview. Add a product image, or choose one on the product’s SeeOnWall tab.
- Hidden
- The button is set to Never show on that product. Change it from the Products tab or from the product’s own panel.
- Not enabled
- Your store shows the button only where it is switched on, and it is not switched on here. Either switch it on, or change Product visibility on the Settings tab.