Before you start
You need a Shopify store and a theme you can edit. There is no separate SeeOnWall account to create — installing the app sets everything up, and billing is handled by Shopify on your usual invoice. The free plan needs no card.
Install the app
Everything starts from the Shopify App Store listing.
- Open the SeeOnWall listing and choose Install.
- Shopify shows you the permissions the app needs — it reads your products and themes, and writes poster sizes back to your products.
- After you approve, the app opens straight into setup. There is nothing to download and no code to paste.

Step 1 — Choose which products get the preview
The first question is the one only you can answer: which of your products belong on a wall. Posters and art do. Mugs and T-shirts don't.
- Every poster with a size — any product with a poster width and height shows the button. Best if your store is mostly art and posters.
- Selected collections or tag — only products in the collections you tick, or carrying the tag you enter. Best if you sell art alongside other things.
- Only products I turn on — nothing shows the button until you switch it on for that product. Most control, most work on a large catalogue.
- Whichever you pick, you can change it later, and any single product can always be forced on or off on its own.
If you choose Selected collections or tag, tick at least one collection or enter a tag before continuing — otherwise the button has nothing to appear on.
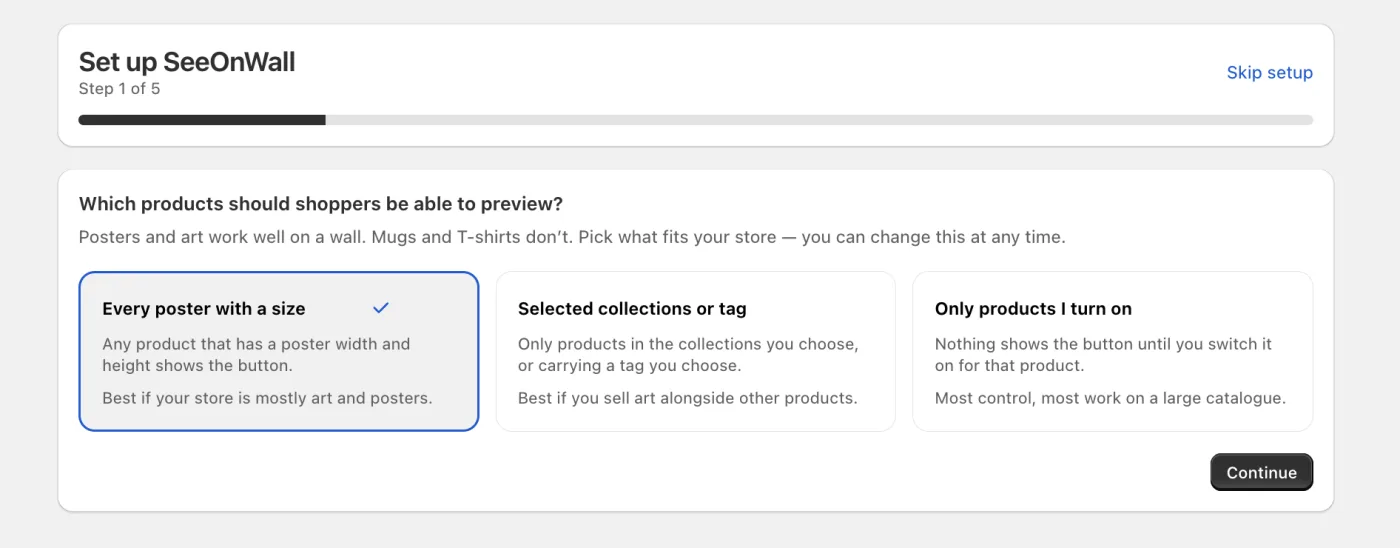
Step 1: three ways to decide which products shoppers can preview. 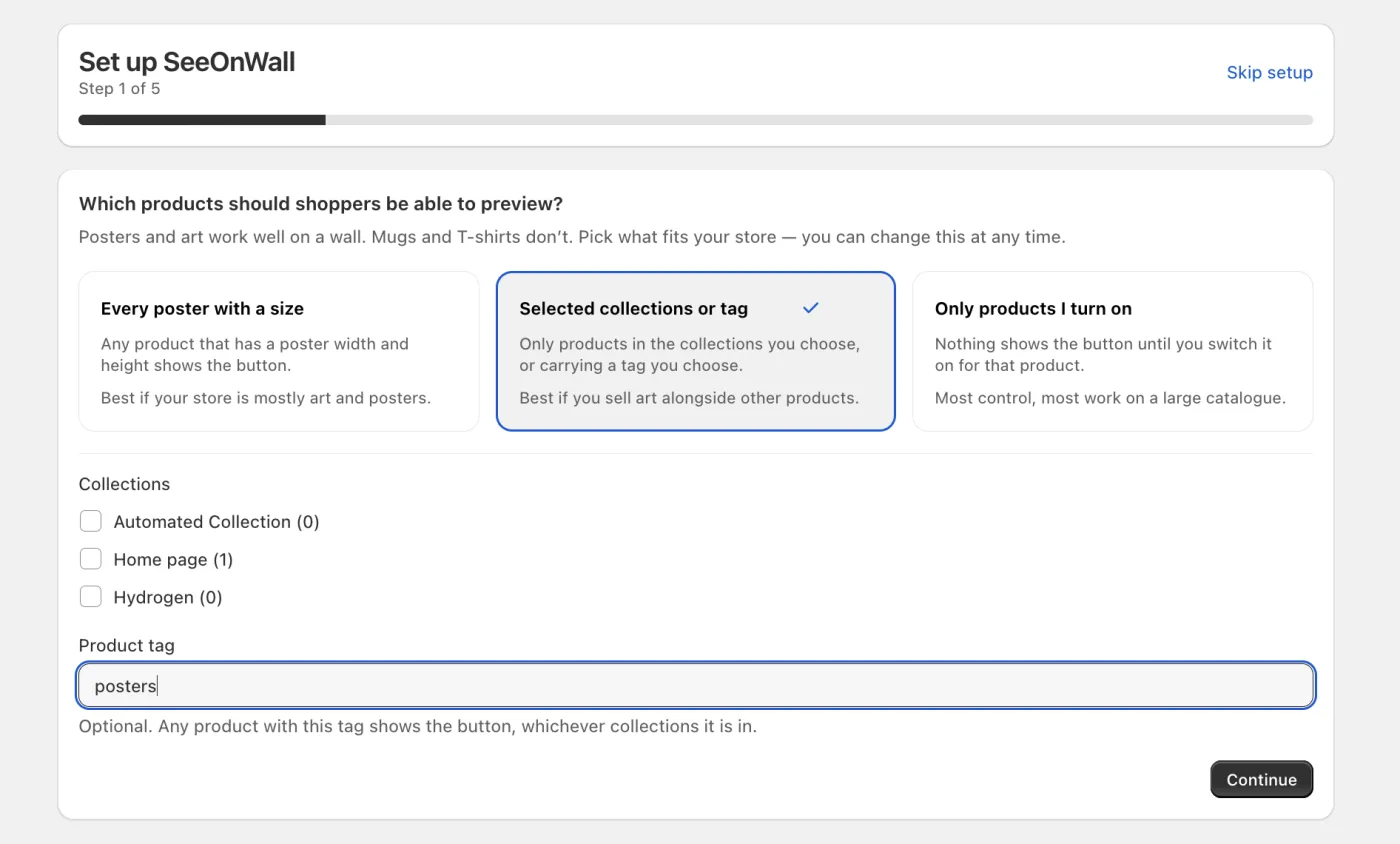
Choosing “Selected collections or tag” reveals your collections and a tag field. Step 2 — Give your posters a size
A wall preview has to know how big the poster is. Most poster stores already put the size in the variant name, so this is usually one click.
- First tell us how to read sizes with no unit. If a variant is called “30x40”, is that centimetres or inches?
- Then choose Scan catalogue for sizes. SeeOnWall reads every variant name and shows you exactly what it found before changing anything.
- Names like “50x70 cm”, “A3”, “18x24 inches” and “21 x 29,7 cm” are all recognised. Names that already include a unit are detected regardless of the setting above.
- Review the list, untick anything that looks wrong, and choose Apply. Sizes that are already set are never overwritten.
- Anything that looks implausible for a wall poster is flagged and left unticked, so a wrong unit can't be applied by accident.
Sizes in inches are the one case worth double-checking. A variant called “8x10” with the unit set to centimetres becomes a postcard-sized preview. If your sizes are in inches, set that before scanning.
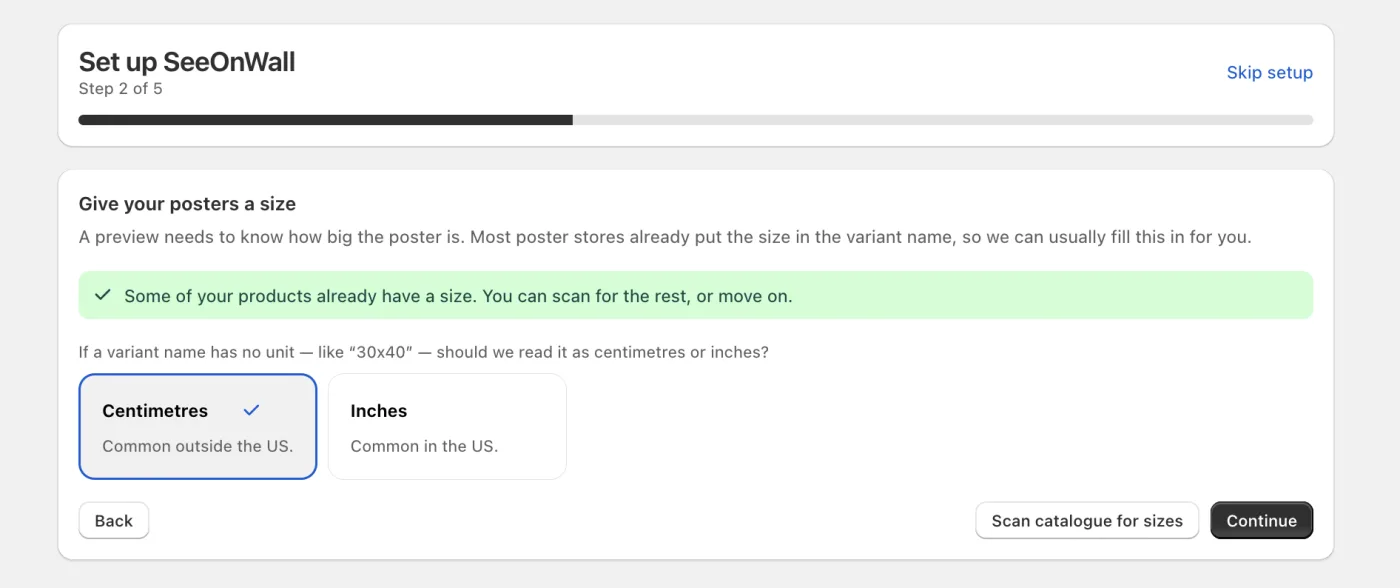
Step 2: choose how unit-less names should be read, then scan. 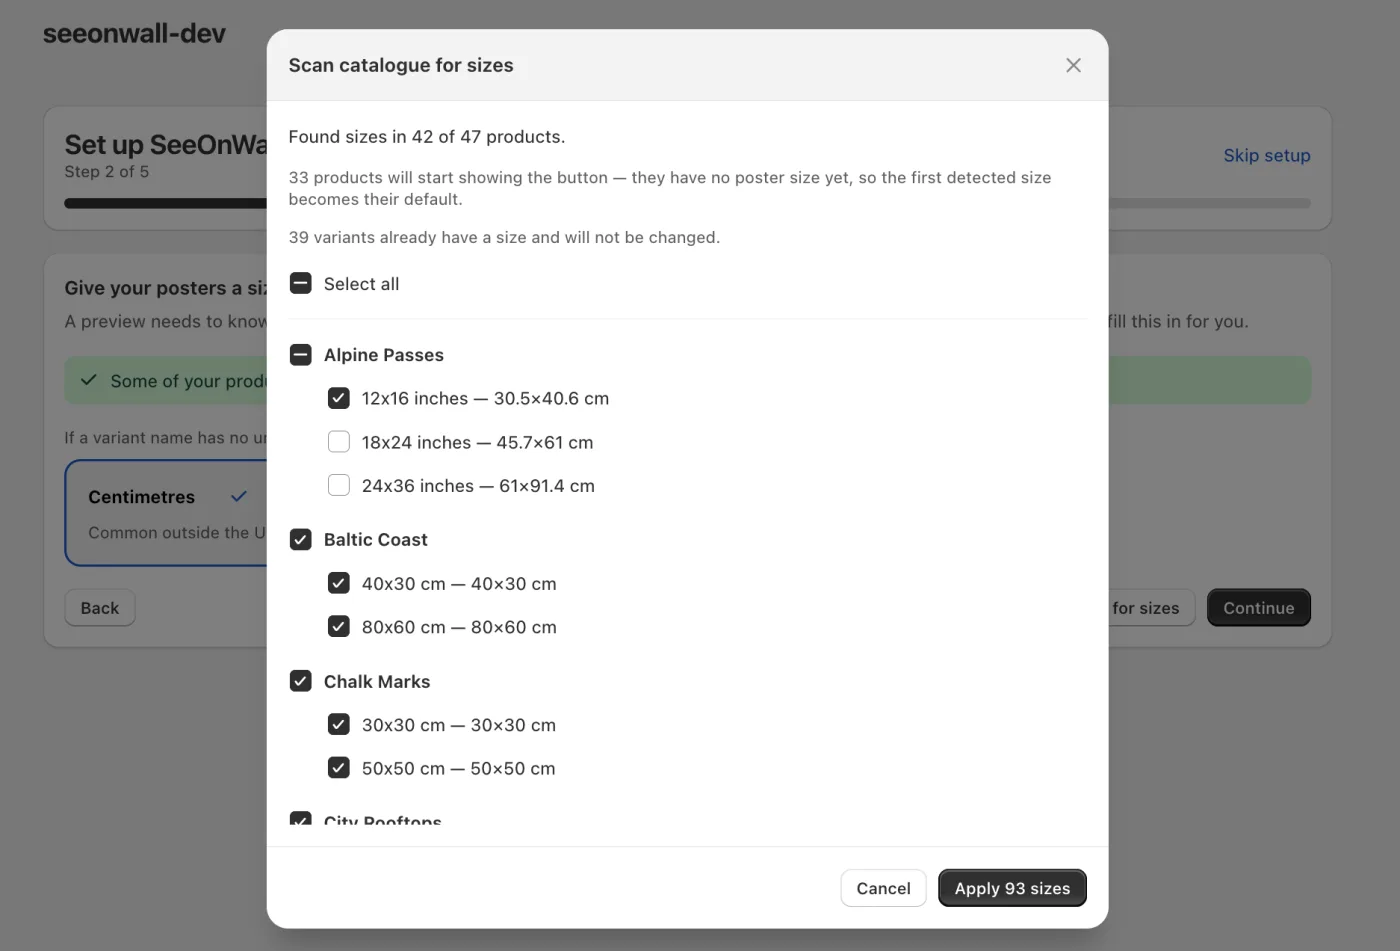
The scan shows every detected size, grouped by product, before anything is written. Step 3 — Tell us where the print is
Only needed if your product photos are mockups — the print on a coloured background, or inside a frame. Skip it if your photos are the artwork itself.
- A mockup photo has the print sitting inside a bigger image. Previewed as-is, the whole photo is treated as the poster, so a 30x40 print looks noticeably smaller on the wall than it will be.
- Pick “The photos are mockups”, then choose one product that uses your template.
- Drag the box around the print itself. We trim the background first as a starting point — on a framed mockup that usually finds the frame's outer edge, so check it before moving on.
- We then scan your catalogue for every other product using the same template, and apply the same area to all of them at once.
- Products whose proportions don't match their poster size are flagged and left unticked, so a mistyped size can't quietly stretch the artwork.
Mockups are usually generated from a template, so one measurement normally covers a whole catalogue. If your photos are the artwork edge to edge, pick the first option and move on — nothing to do.
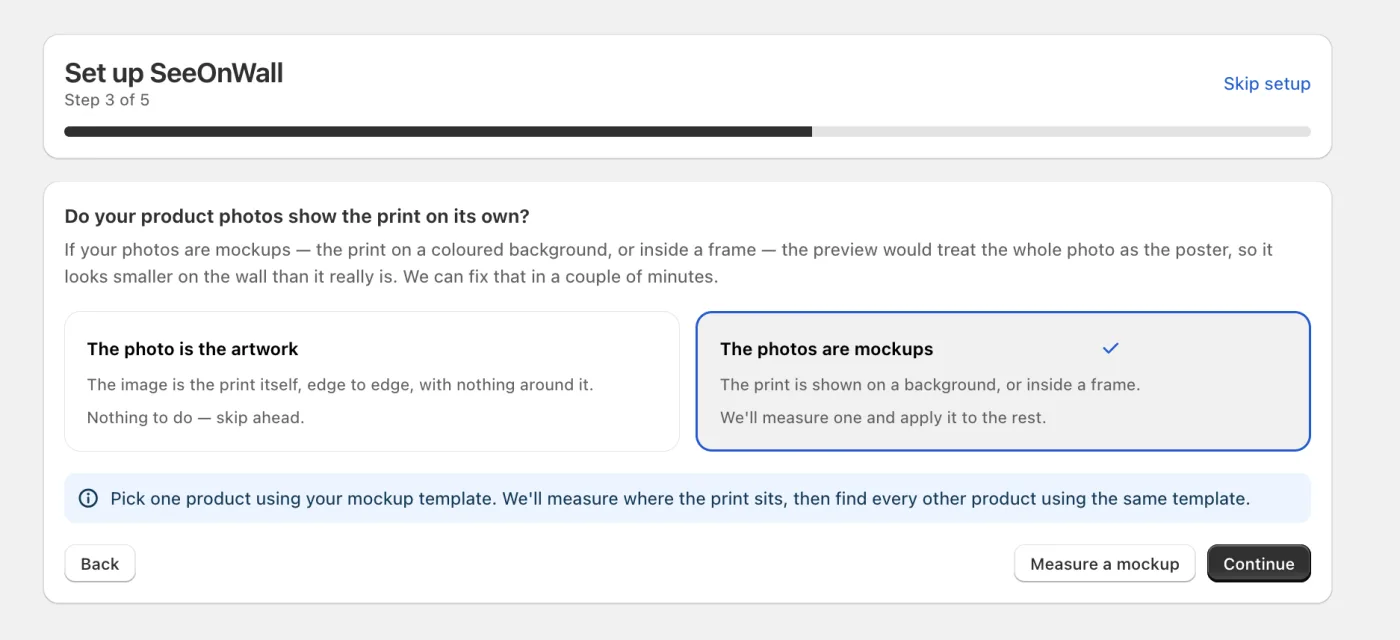
Step 3 asks one question. Most stores answer it in a click. 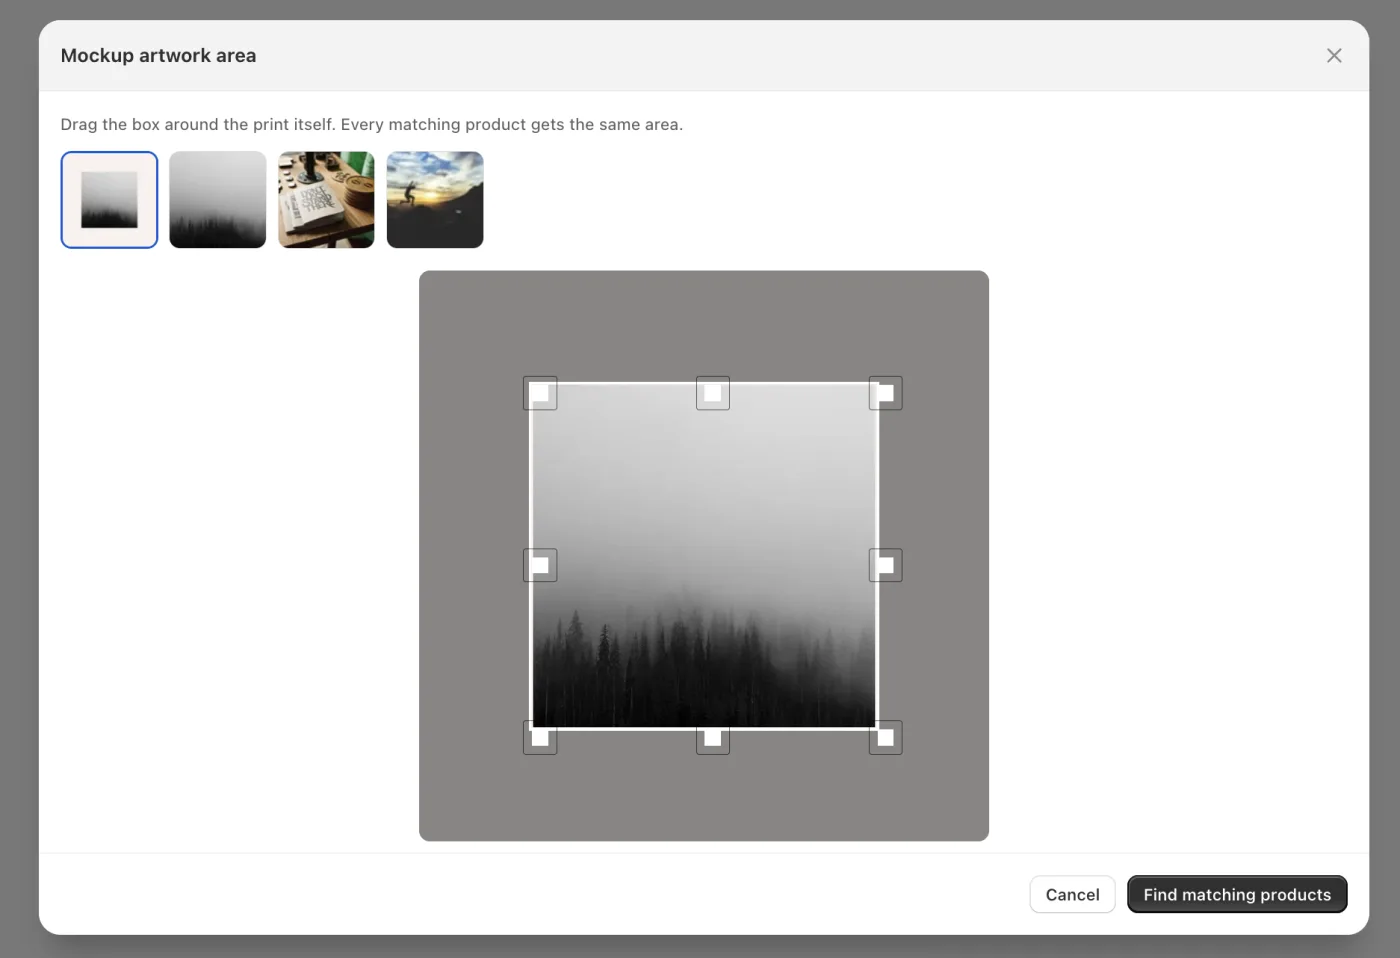
Drag the box around the print. Every product using the same template gets the same area. 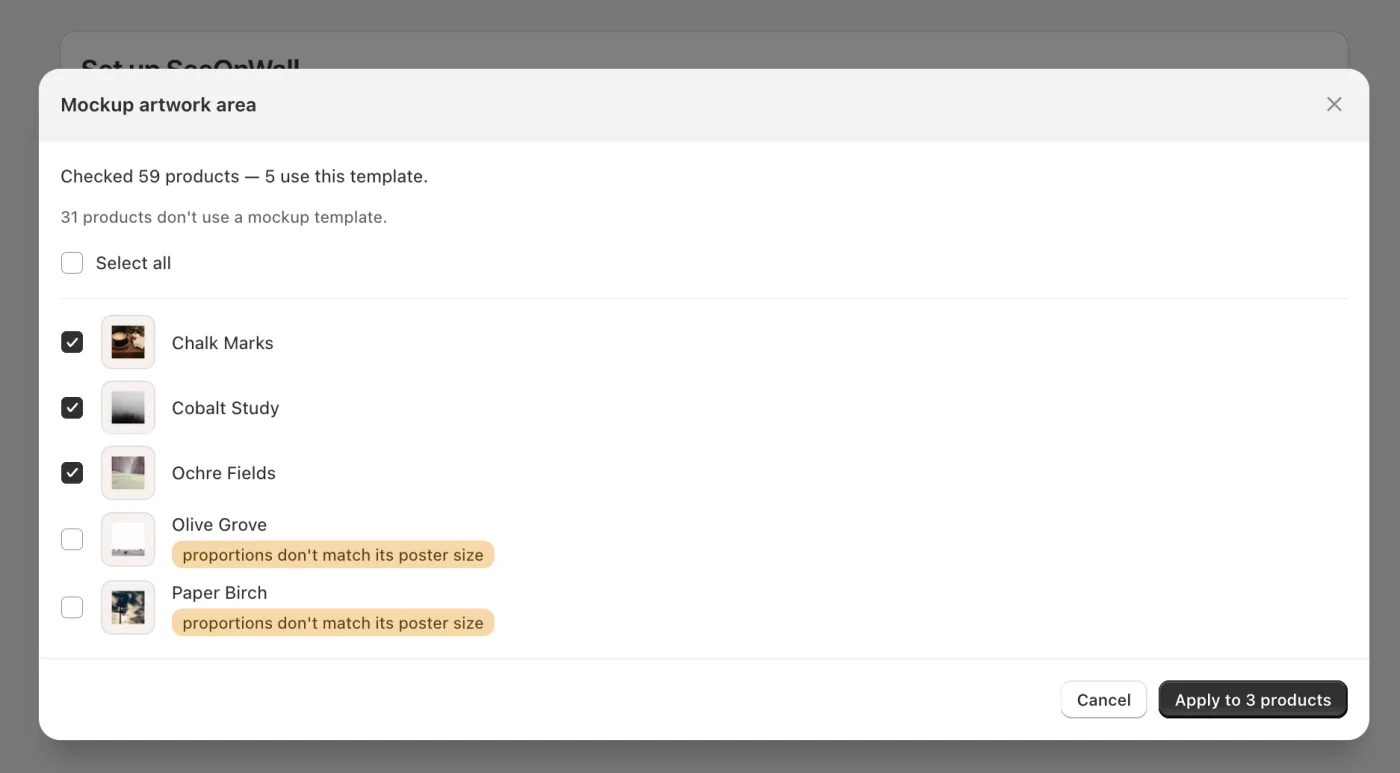
Every product using the same template, found in one pass. Anything whose proportions don't match its poster size is flagged and left unticked. Step 4 — Add the button to your store
Two changes in your theme. Each opens the theme editor; press Save there and come back — the app rechecks itself automatically.
- Turn on SeeOnWall in your theme. This loads the preview once across your whole store, and is what makes the button work anywhere.
- Add the button to your product page. This places “See on wall” next to your Add to cart button.
- Each row turns into a tick once the app can see the change. If a tick doesn't appear, choose Check again.
- Once both are ticked, the rows switch to Open so you can jump back into the theme editor to adjust styling.
- Using an older theme that doesn't support app blocks? Turn on the app embed and use automatic placement instead — see below.
Shopify's theme editor doesn't save on its own. If a step won't tick, the usual reason is that Save wasn't pressed in the editor.
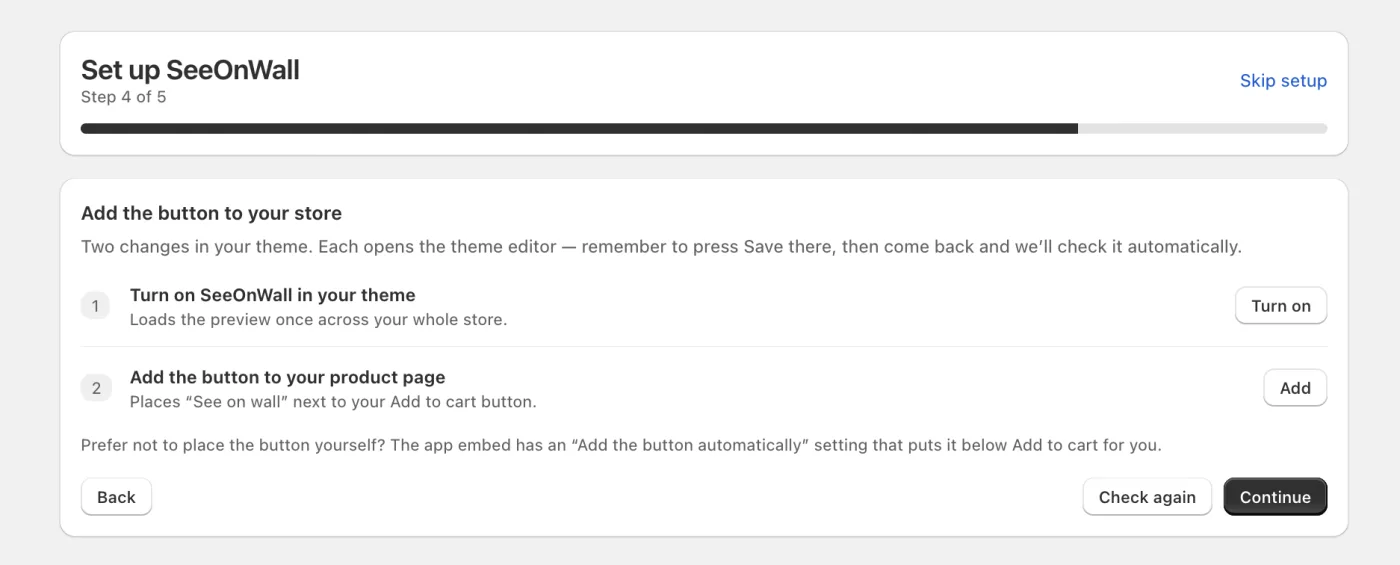
Step 4: two theme changes, each with its own button. 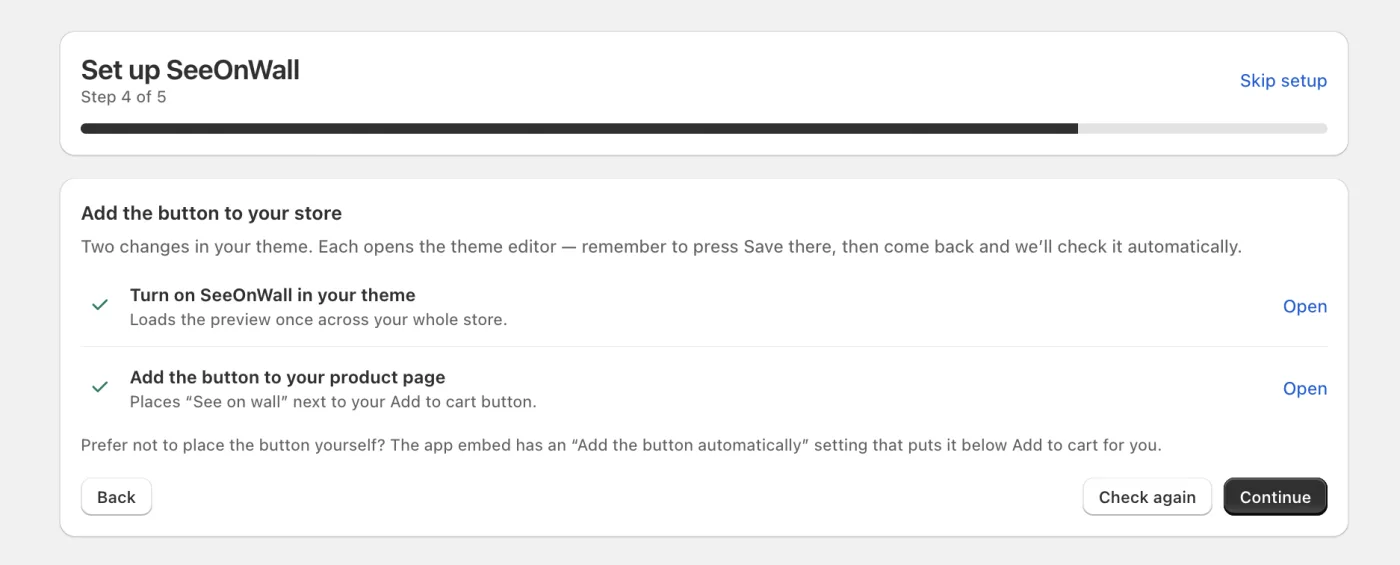
Both steps ticked. The rows switch to “Open” once they're done. Step 5 — You're set up
The last screen recaps every decision so you can see anything left unfinished.
- Which products show the button, whether your posters have sizes, and whether the button is in your theme.
- Anything not ticked can be picked up later from the Configuration tab — nothing is lost by finishing here.
- Go to my posters takes you to your catalogue, where you can check individual products.
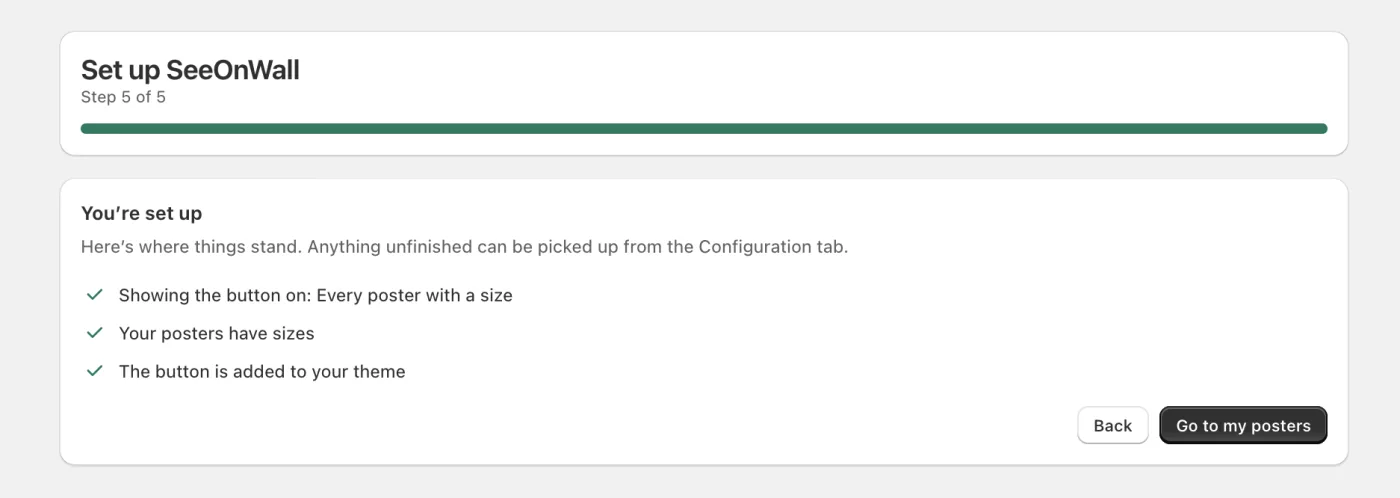
Step 5: the recap. Everything ticked means shoppers can preview your posters.
After setup
The wizard runs once. These are the screens you'll come back to.
Your posters
The Products tab lists every product with its preview status, so you can see at a glance what shoppers can and can't preview.
- Live means the button appears. No size means the product has no poster dimensions yet. Off means something is excluding it.
- The counters at the top summarise your whole catalogue, and the filter narrows the list to one status.
- Turn on and Turn off override the shop-wide setting for a single product — useful for one artwork you'd rather not preview.
- Edit opens a product's poster size, its per-variant sizes, and its preview image, without leaving the app.
- Scan catalogue for sizes is here too, along with the size unit used for variant names that have none — both apply shop-wide.
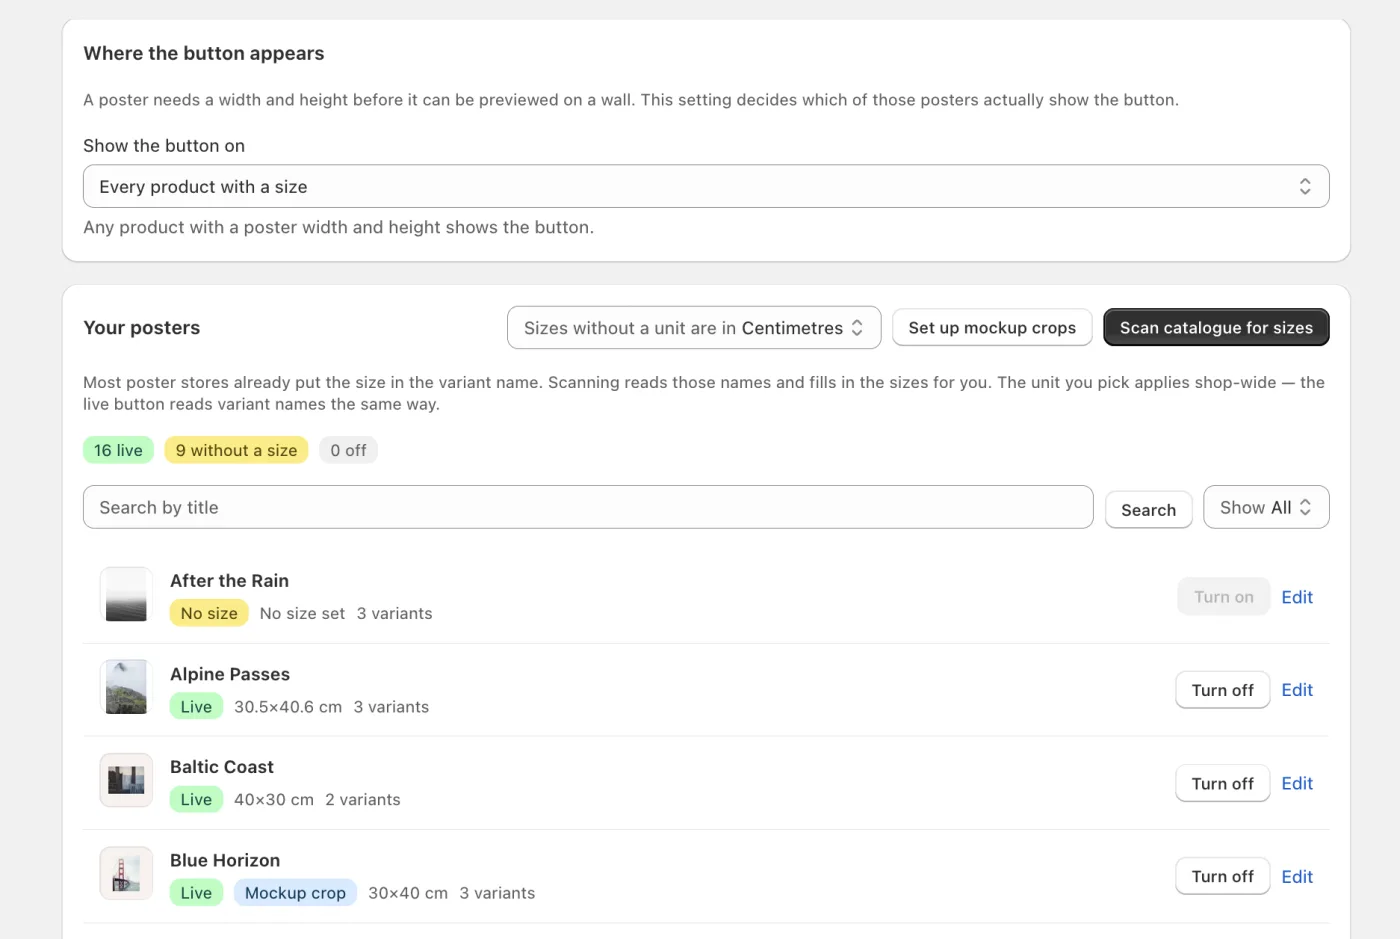
Every product with its status, and the setting that decides where the button appears. Fixing one product on its own
Every product can be edited by hand from the Products tab — useful for the odd photo that doesn't match your usual template.
- Click Edit on any product to set its poster size, its per-variant sizes, and whether the button shows.
- Under “Poster image & artwork area”, pick which of the product's images the preview should use.
- Drag the box around the print, or press “Use the whole image” if the photo is already the artwork.
- “Clear selection” only affects the preview — the product keeps all its images and goes back to whichever one your theme shows.
- Products with an artwork area set carry a “Mockup crop” tag in the list, so you can see at a glance which ones are done.
Changing the poster size and the artwork area together is fine — the proportions check compares the two and warns you if the box would stretch the print.
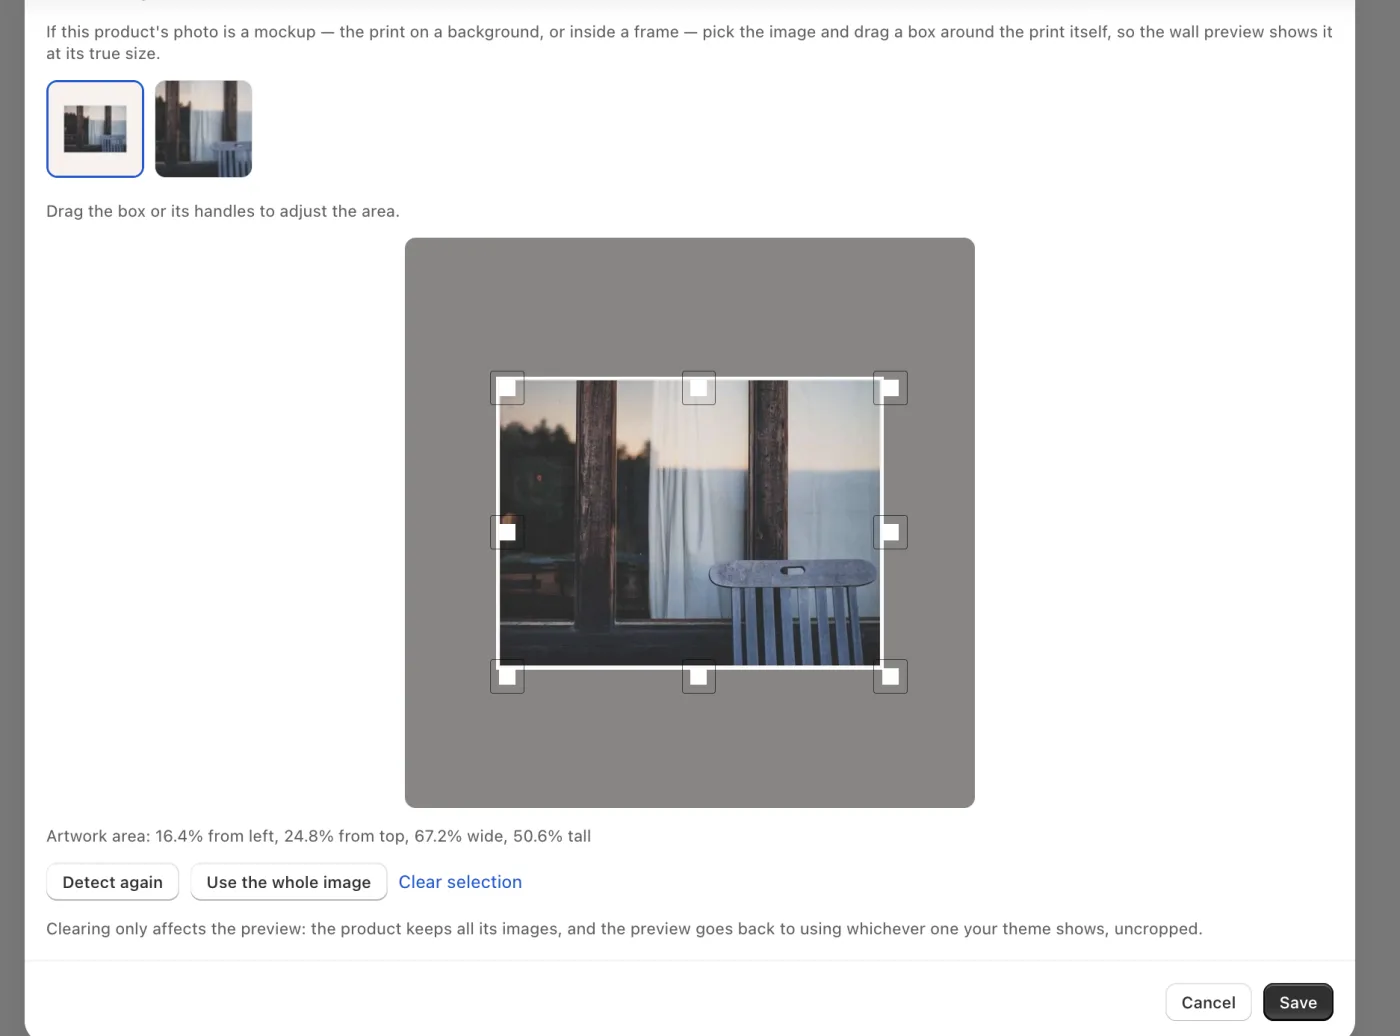
Pick the image, drag the box. The percentages below update as you go. Making the button match your theme
The button block has its own settings in the theme editor, so it can be styled to look like the rest of your store.
- Background, text and border colours, plus corner radius.
- Button CSS class — paste your theme's own button classes here and the button inherits them, matching Add to cart exactly.
- Find those class names by inspecting your theme's buy button in your browser.
- In the theme editor, the block also lists every variant and the size it detected, so you can check before publishing.
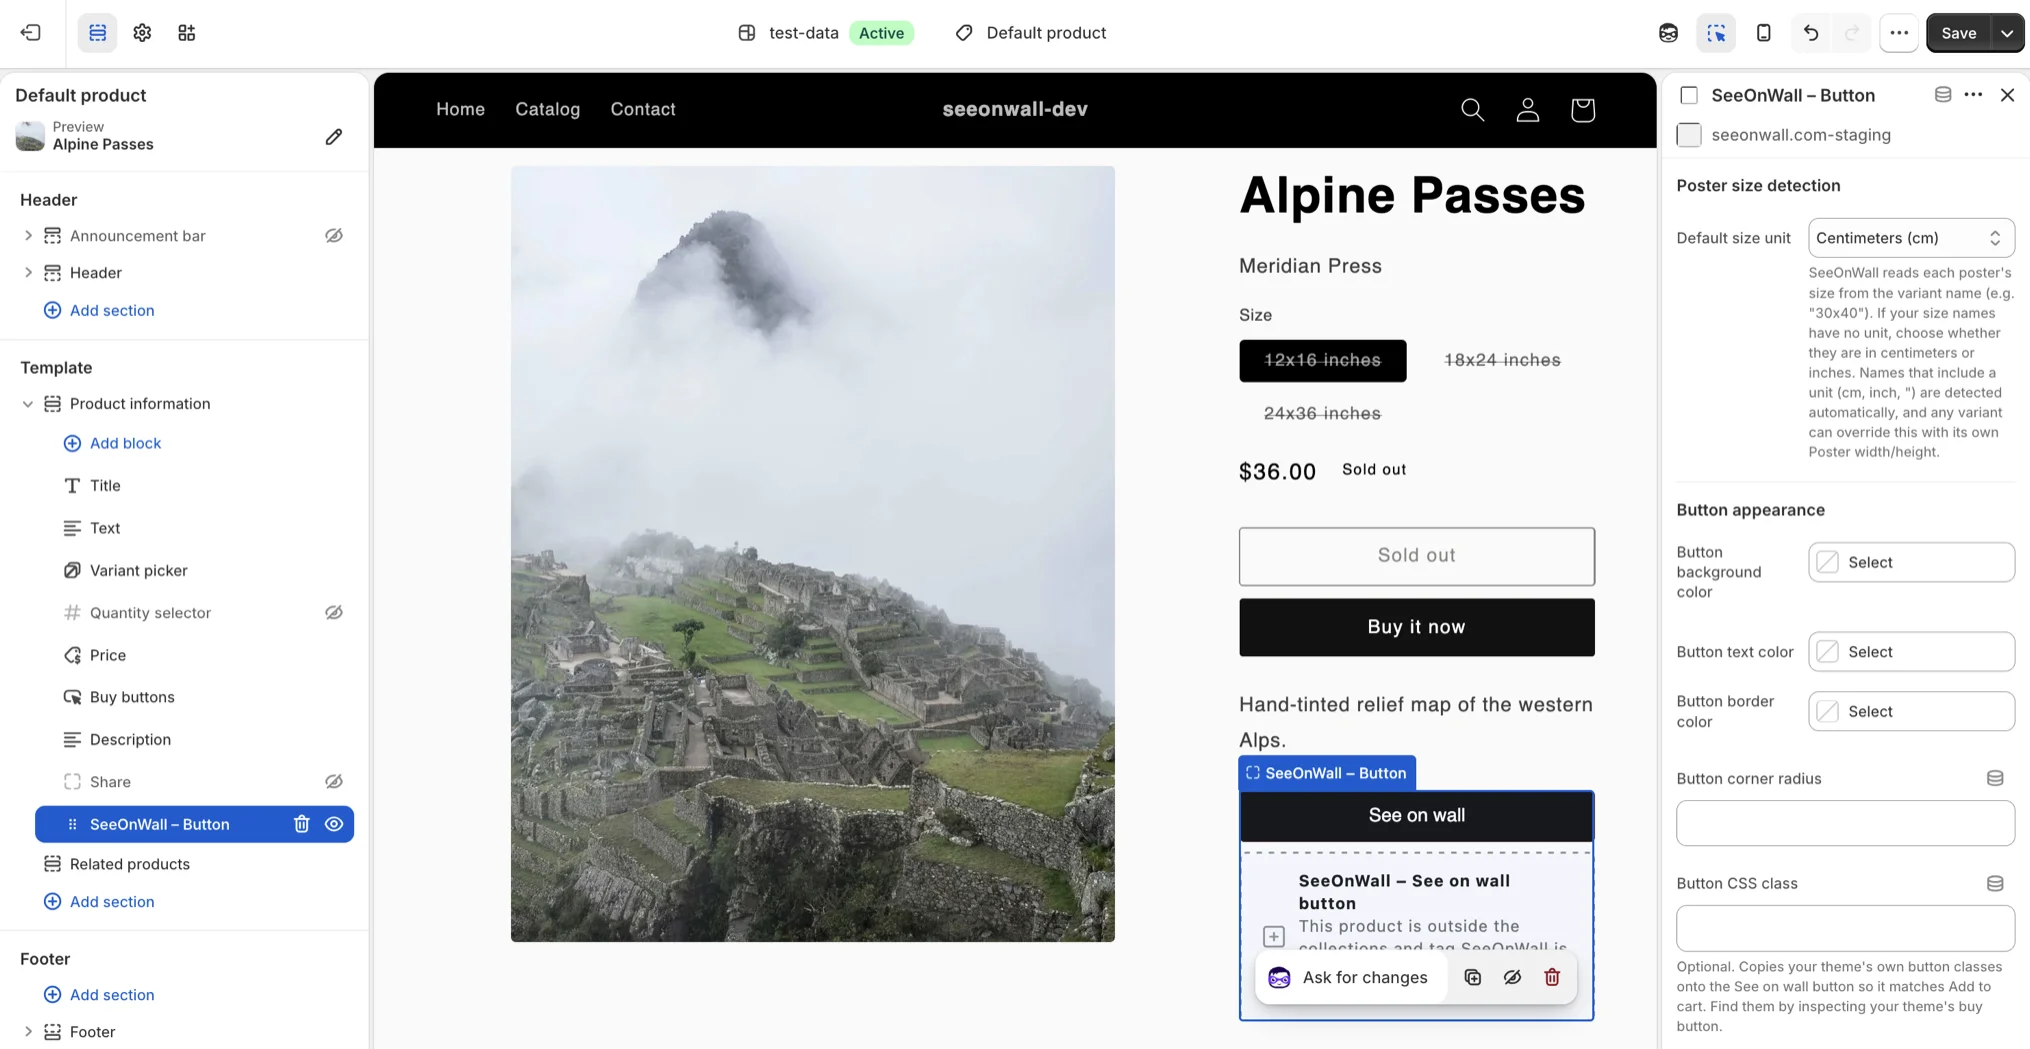
The button block's settings, in Shopify's theme editor. App embed settings and automatic placement
The app embed carries the store-wide settings — and an option that places the button for you.
- Add the button automatically puts “See on wall” below Add to cart without you placing a block.
- This is the answer for older themes that don't support app blocks at all.
- Language can follow your storefront's locale or be pinned to one language.
- Colours set here apply store-wide; the button block can override them per product page.
If you've already added the button block to your product template, that one wins and automatic placement is ignored — so you'll never end up with two buttons.
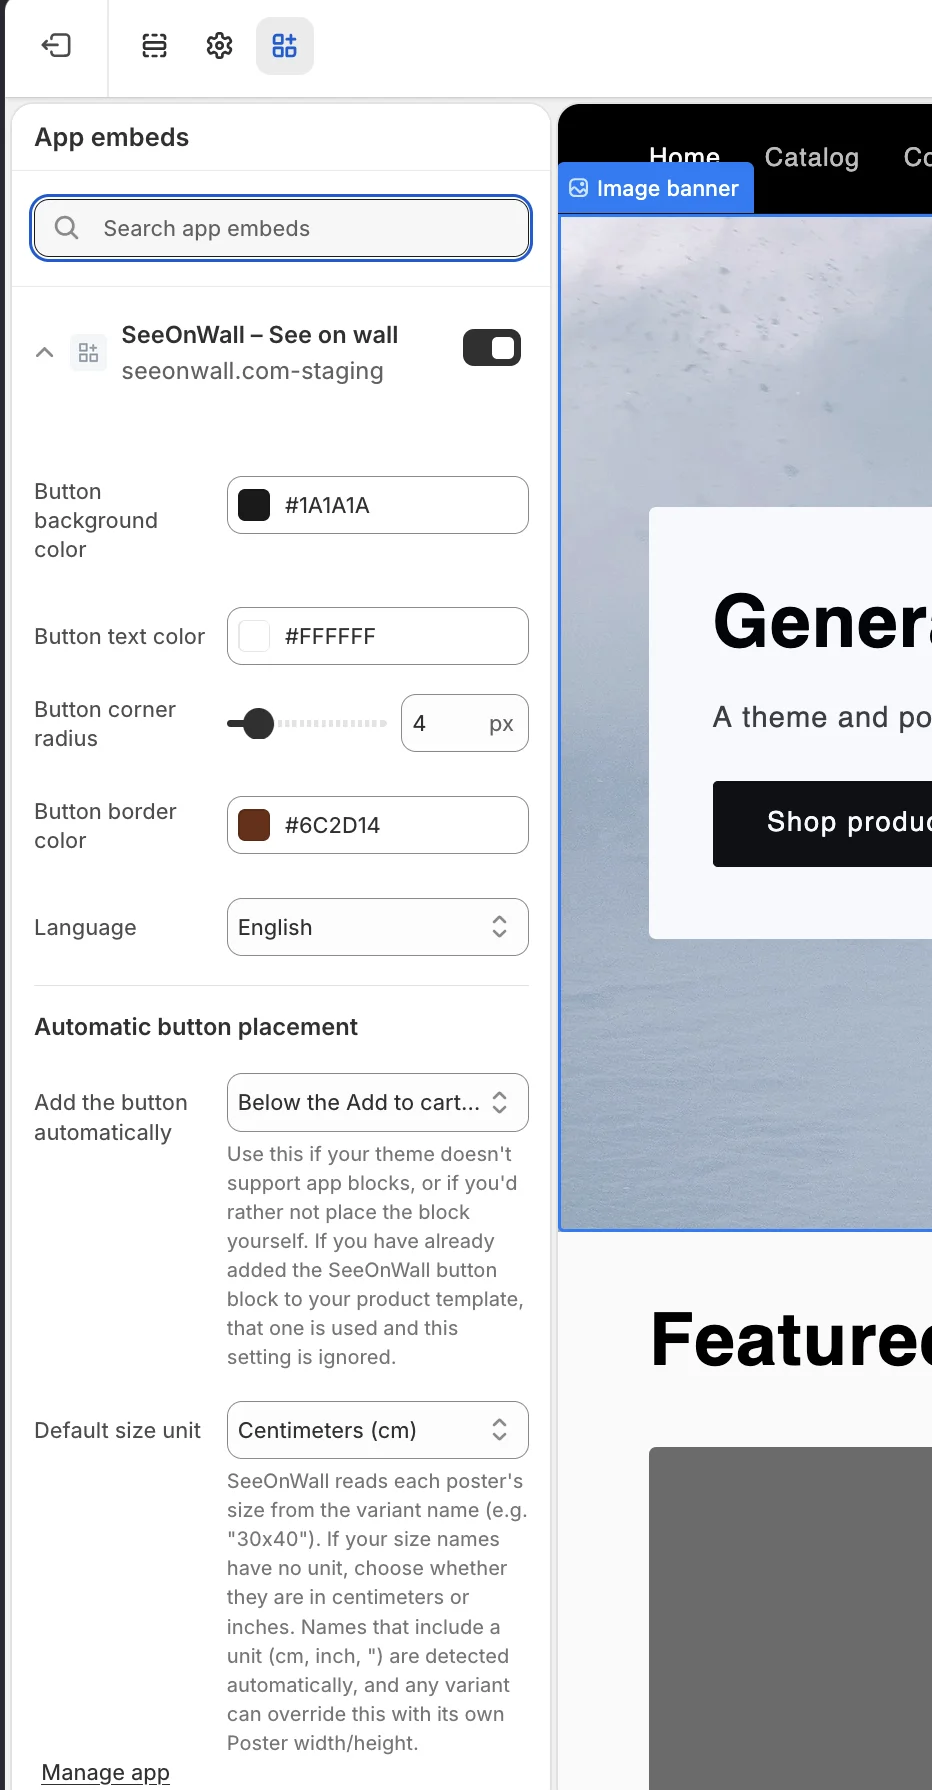
The app embed, including automatic button placement. If the button doesn't appear
The Configuration tab has a check that walks the same path the storefront does and tells you which step fails.
- Open Configuration and find “Why isn't my button showing?”, then pick the product in question.
- It checks the app embed, the button block, the poster width and height, and whether your activation setting includes that product.
- The first failing step is named directly, so you know what to fix rather than guessing.
- For multi-variant products it also reports how many variants resolved a size, which catches sizes missing from a few variant names.
Need a hand?
We’re happy to help you get set up. Email us at support@seeonwall.com.